Table of Contents
Using DIRE and GATE
Introduction / Disclaimer
This page is aimed at giving basic advice on how to use GATE and DIRE in your project. Keep in mind that GATE is much richer than what will be covered here; for more advanced advice please refer to the GATE user guide.
This page has been written using information from the GATE user guide and a bit of practice. It is in no other way related to GATE itself and does not aspire to anything other than a pragmatic retelling of what worked. You may find more efficient ways of doing what is described here, and you may find errors (and in both cases you may edit this page accordingly, while keeping its purpose of introduction into GATE).
Reminder: GATE is an english project. Do not be surprised to find english words (e.g. analyser) rather than american english (analyzer).
Creating and managing a GATE Plugin
A GATE plugin (also known in our context as a DIRE contribution) is basically a Java package containing classes that are the resources made available by the plugin. Of course, there are a few constraints that apply.
Preparing GATE
In order to be able to develop a full-fledged plugin, you will need to install a bit of software first.
- GATE itself: please refer to the corresponding part of the manual.
- Apache Ant: again there is a manual for that. You will have to set environment variables within your OS.
Creating a plugin
The simplest way is to launch GATE, then use Tools → Bootstrap Wizard. The parameters are:
- Resource name: the plugin name (and not the name of the resource made available, though both can share the same name if the plugin contains only one resource).
- Resource package: the java package name and path (reminder: DIRE projects use the following path:
fr.cnrs.liris.drim.yourpackage). - Resource type: our example here will create a ProcessingResource. Creating other resources is possible (processing resources process document, language resources are documents and corpora, and visual resource alter the GATE Developer GUI).
- Implementing class name: the name of a resource to include in the plugin (you can only put a single resouce in a plugin via the wizard, but you will be able to add the others afterwards).
- Interfaces implemented: should be filled automatically.
- Create in folder…: to keep things simple, choose or create a folder within the GATE install directory (for instance the plugins directory).
When you press Finish, the whole plugin structure is created, including the build.xml ant file.
(Warning: all these files are created using the default system encoding standard, which is most likely not unicode)
Developing a resource within a plugin
First steps
When creating the plugin, you had to provide an implementing class name. You can find this class in the src directory.
The first step is to get a functional resource class, and the necessary code is provided in the GATE manual. Just copy/paste the code in your class and make the necessary modifications. If you want to access the document being processed, ensure your class implements AbstractLanguageAnalyser. This should be the case if you pasted the example code from the manual.
Creating more resources within the plugin is as simple as creating more classes within the package.
Coding
Now in order to implement the actual function of your resource, you have three areas you must alter within the class:
- The execute() methode, which will be called whenever the processing must take place.
- The JavaBeans parameters: all GATE resources implement the JavaBeans style of coding. This means that if you need external data, they must be provided using setters (and accessed using getters). The code example you pasted contains example methods, and you can add your own. Remember to define the GATE metadata as explained in these examples.
- The reinit() (and possibly init()) methods: whenever a resource is instanciated, init() is called. On some occurrences, reinit() may be called, and this method must return the instance to the exact same state as it was when init() first ended.
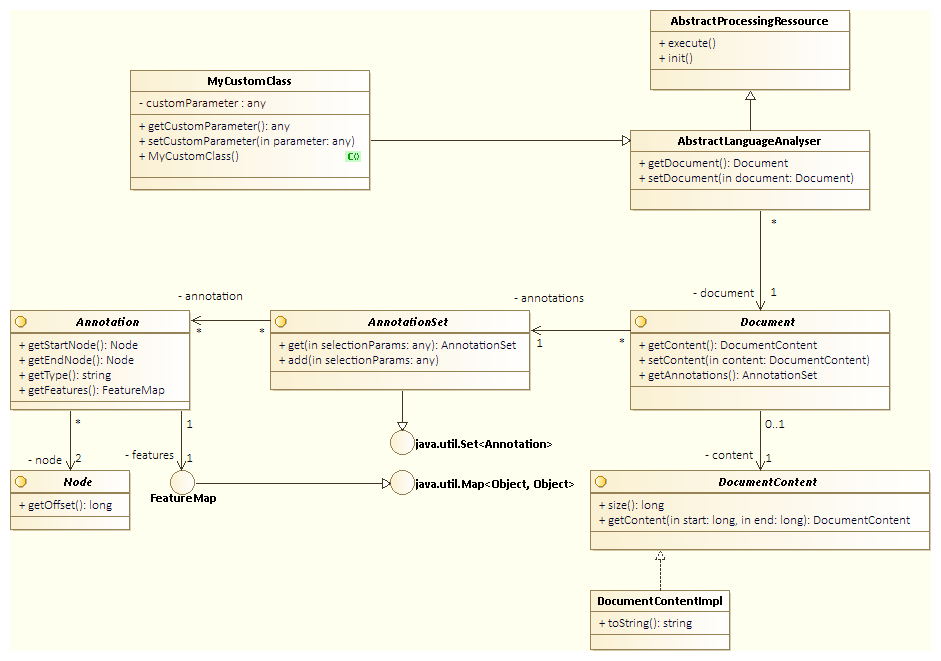
You will probably have to access the document that is processed in order to add or manipulate annotations. Here is a partial class diagram of the most immediate classes you should know about, MyCustomClass being your resource class:

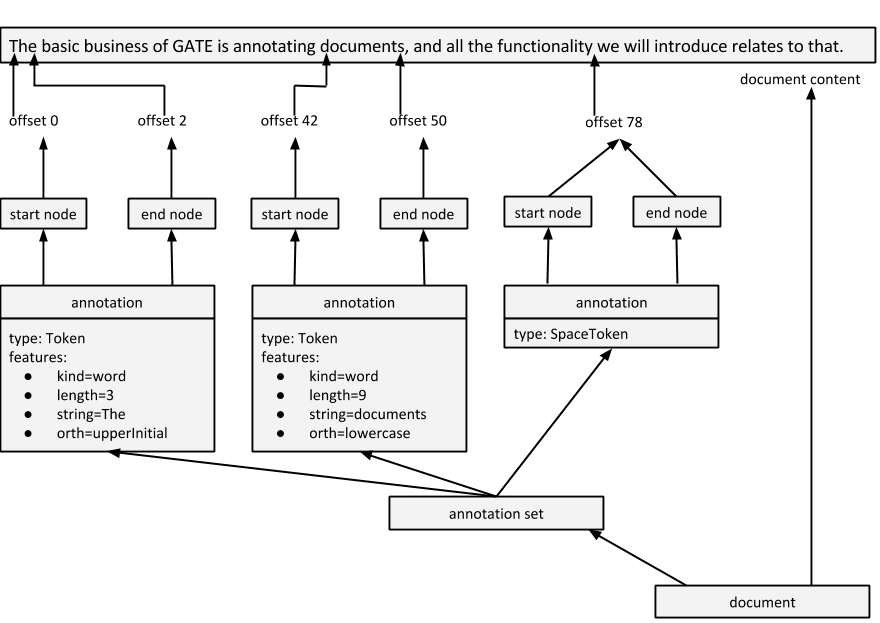
Within the GATE document you will access, this translates as the following object structure (the example annotations are taken from the output of a tokeniser):

Here are a few more guidelines:
- You can access and even modify the document content: do not do this unless you can ensure either 1) that this resource is called before any annotation or 2) that you keep the annotations offsets consistent. In the first case, be sure to describe your resource as a
Correctoron the DIRE site, and please remember that it should be seen as a bad practice (hack). - You can access and modify annotations created (or modified) by other resources. Adding features to an annotation should always be okay, however should you modify or delete a feature be sure to take into account the effect on the following processing resources (if your resource is not the last one).
- The processing resource must use the JavaBeans design style (that is, a no-parameter constructor and getters and setters instead). Ensure that every newly-constructed object is in a valid state (using either exceptions, default values, or both).
Compiling and Testing
To compile the plugin, use the build.xml file (either in your favorite IDE, or by calling ant build in the plugin directory).
Testing the plugin can be done within GATE:
- Load the plugin using
File→Manage Creole Plugins…. If your plugin is in the GATEplugindirectory, you should find it in the list. If not, simply put it there temporarily and restart GATE. It is better not to use the directory that can be specified in theConfigurationtab, since that one is the directory where all non-GATE plugins will be installed (which is much more suited for containing the final version of your plugin, among others).
Lifecycle of a plugin within the DIRE platform
Versioning
To be able to put your plugin on the DIRE repository, you must first ensure that GATE can find its version number. GATE will indeed manage the plugin update.
The version is an attribute of the CREOLE-DIRECTORY element in the creole.xml file. In fact, you must also define an ID attribute for GATE to be able to identify your plugin. Simply put the package path as the id (it will not be displayed anywhere visible).
Here is a possible configuration:
<CREOLE-DIRECTORY ID=“fr.cnrs.liris.drim.myownplugin” VERSION=“1.0”>
For more complete information, see here.
Adding a plugin to the DIRE repository
To add a plugin to the repository, you must have access to the DIRE liris account (or find someone who has this access).
- Your plugin must be compiled and the version number must be displayed in the creole.xml file.
- All content regarding the chosen license must be included where it belongs (for instance, the GPL license file in the directory, and the corresponding text on all source files, like here).
- zip the plugin directory (that is, the directory containing creole.xml and build.xml and so on; not the GATE plugin directory containing all plugin directories).
- Rename the resulting archive creole.zip and put it in the directory; this archive is what will be downloaded.
- Upload the resulting directory in the gate directory on the server account.
- If it is the first time this plugin is uploaded, you must also register it in the
gate-update-site.xmlfile. Simply add a<CreolePlugin url=“DirectoryName/” />.
You can then verify that the plugin appears when launching GATE (see the following sections).
Installing plugins from the DIRE repository
- Launch GATE.
- If it is not already done, in the
File→ManageCreole Plugins…→Configurationtab specify a directory for the installed plugins. Then use the+button to add the DIRE repository (http://liris.cnrs.fr/dire/gate/gate-update-site.xml) to the list of Plugin Repositories. Ensure that the newly-added DIRE repository is enabled. Click theApply Allbutton. - In the
Available to Installtab, select the plugins you want to install. Click theApply Allbutton again. - In the
Installed Pluginstab, find the newly-installed plugins and selectLoad NowandLoad Always.
Updating the DIRE plugins
Plugins that can be updated will be displayed in the File → ManageCreole Plugins… → Available Updates tab.
- First deactivate these plugins: deselect them in the
Installed Plugins, click theApply Allbutton (all resource from these plugins should disappear both from theright click→New…menu and from the Resources tree). - Close and restart GATE.
- In the
File→ManageCreole Plugins…→Available Updatestab, select the plugins and click once more onApply All. - In the
Installed Pluginstab, find the newly-updated plugins and reactivate them (selectLoad NowandLoad Always). - Recreate the necessary resources in the Resources tree if necessary.
Using GATE within a larger application
Preparing GATE
Like before, in order to be able to use GATE within a project, you will need to install GATE first, along with any plugin you would like to use. See the previous sections for the latter.
There are to ways of embedding GATE into your project:
- Either including GATE in your project per se (for instance as a Maven dependency); in this case, you will not require the users to install GATE themselves, but they will not be able to update the plugins easily themselves (but in that case, you probably do not want them to worry about it so it should be fine as long as you can ensure they get the updates automatically).
- Or having the users install GATE and the plugins and maintain both up to date independently, and only then be able to use your GATE-embedding software.
Loading GATE into a java project
As covered in the corresponding part of the GATE manual, you will have to include the GATE libraries in the project (/bin/gate.jar and the content of /lib), or use the Maven repository.
You will also have to fetch the plugins you intend to use, by either:
- Installing them in your GATE and adding GATE and the plugins as a prerequisite to installing your software, or
- Copying the install directories in a path relative to your software and moving them along. In this case, you will need to specify:
- the path to the plugins in the code (for instance
System.setProperty(“gate.plugins.home”, “./plugins”);) - the path to the main gate configuration file (which should translate into something like
System.setProperty(“gate.site.config”, “./gate.xml”);if you copy a gate.xml file into your project directory)
This must be done before any call to GATE within the code.
Running GATE within the project
In order to use GATE, you will have to:
- First initialise GATE and load the plugins you intend to use.
- Wrap the documents to process into the corresponding GATE classes (at least a Corpus and a Document), which includes setting several parameters.
- Create a process using the resources you want to use, and feed it the documents.
- Execute the resources
- Get the annotations from the document as the result of the process.
A code example is available to illustrate this process. It uses our RSSParser GATE plugin to read and annotate the content of an RSS feed, and deals with the other issues: getting the feed from the user, scheduling the content refreshing, enforcing said schedule and outputting the content in a suitable html style.
The annotated code of the class dealing directly with GATE is available here and the full application is available as a Netbeans project here.
Note that in order to make it work without modification, you must have the Toolkit_RSS plugin installed in a directory named plugins_dire within your GATE install directory, and you may have to manually include the libraries again.
Further code examples can be found on the GATE site itself.

