
In its current state, PAGoDA heavily relies on OpenStack as cloud provider. The following documentation presents in detail what OpenStack is, its main concepts and how to use them through various examples provided at the end.
About Openstack
From wikipedia:
OpenStack is a free and open-source software platform for cloud computing, mostly deployed as infrastructure-as-a-service (IaaS), whereby virtual servers and other resources are made available to customers.
More concretely, when given a pool of possibly heterogeneous hardware resources like virtualized CPUs (vCPUs), memory and hard drives, the OpenStack software platform will allow to deploy Virtual Machines (VMs) with their respective central memory and logical disks.
For instance, we given a pool of 12 virtualized CPUs (vCPUs), 16GB of RAM and 1TB of hard drive, OpenStack will be able to spawn two VMs configured e.g. as follows :
- 1 VM with 4 vCPUs, 8GB of RAM and 750GB of HDD
- 1 VM with 8 vCPUs, 8GB of RAM and 250GB of HDD
The following section first presents the main OpenStack notions that should be properly understood in order deploy a PAGoDA instance. The section then provides some illustrative tutorials in order for you to assert that you have valid access to an OpenStack instance. Eventually some tutorials illustrate previously described OpenStack notions by allowing you to manipulate concrete OpenStack components and resources.
OpenStack main notions
Project
A project of an OpenStack service is a pool of resources (vCPUS, RAM, HDD) together with their respective current usage and limits of usage. A project is usually described by the following concrete information:
- Number of deployed instances / maximum number of possible instances
- Number of vCPUs used / number of available vCPUs
- Quantity of RAM used / available RAM
- Number of used volumes / maximum number of volumes
- Number of used Volume Snapshots / maximum volume of snapshots
- Quantity of volume storage used / available volume storage.
When logging in the OpenStack web User Interface (webUI), the landing page offers an overview of the currently selected project. Such a project overview summarizes the current state of its resources (this project summary page is accessible from the Compute > Overview menu entry located on the left sidebar).
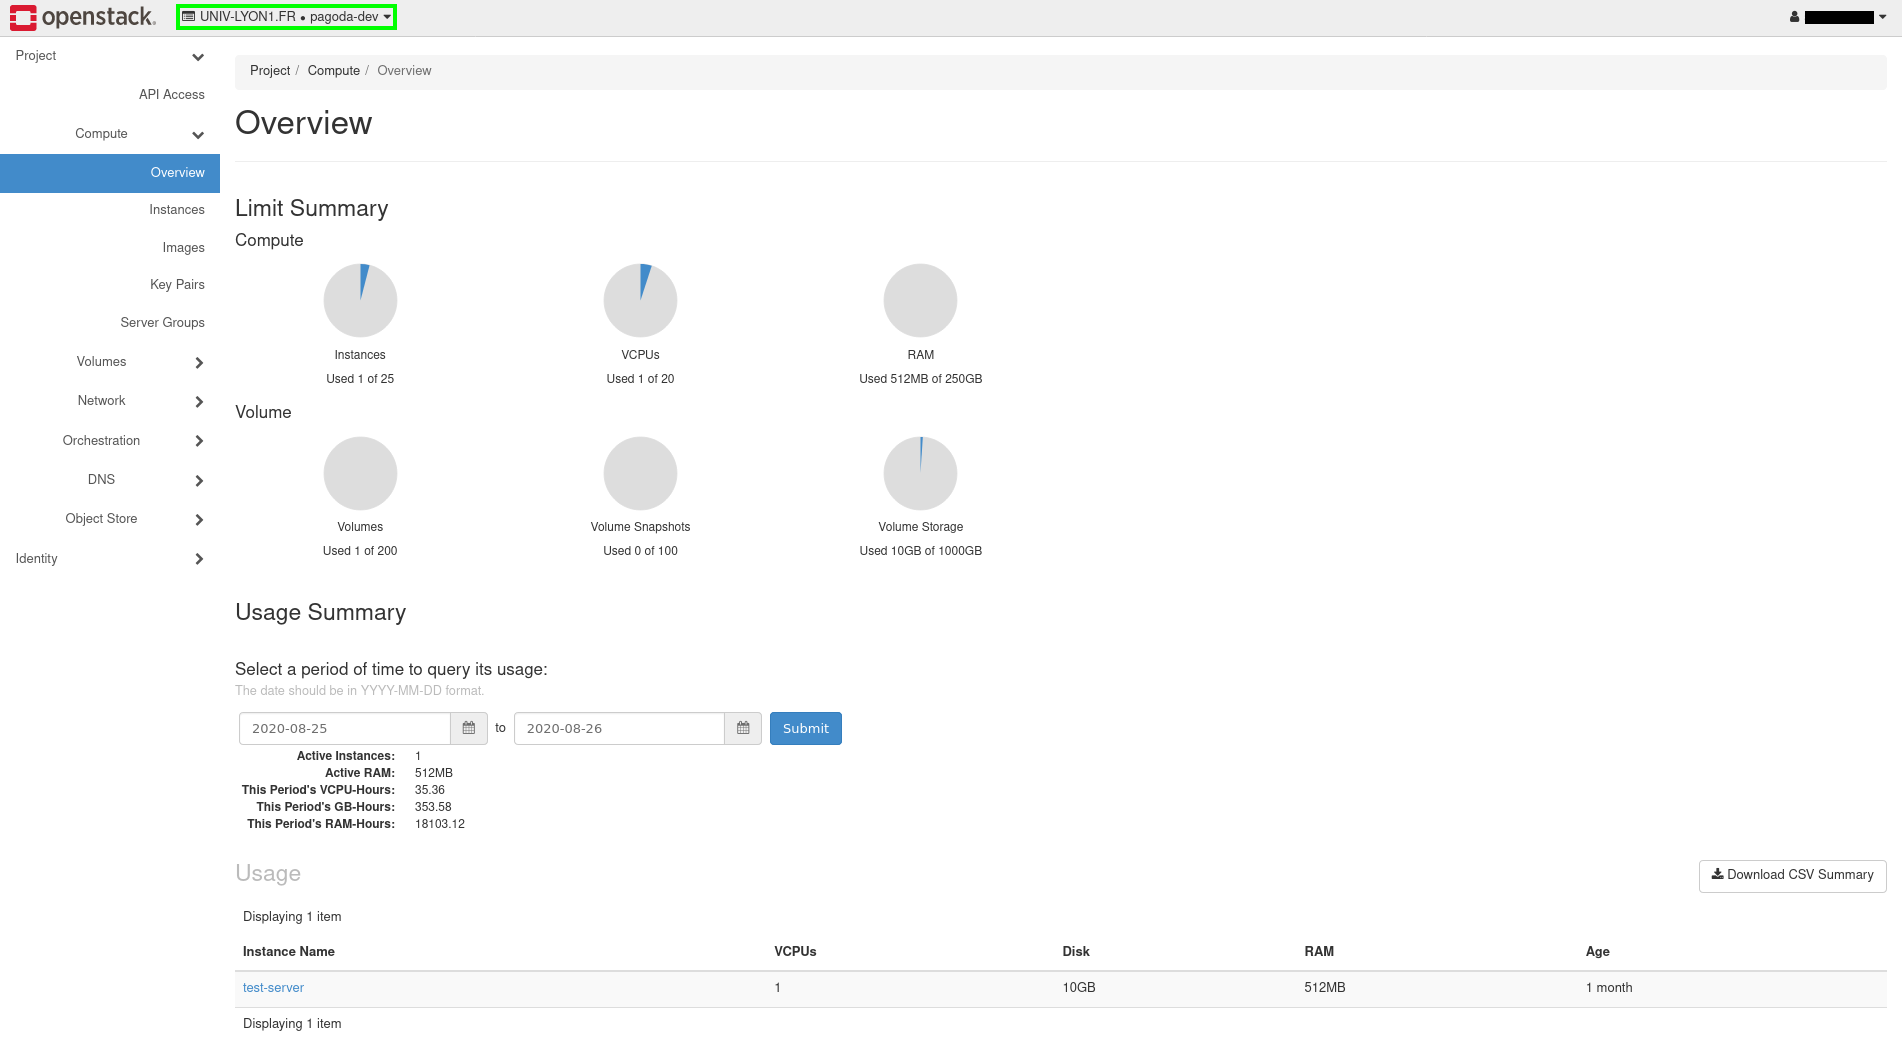
If you have access to multiple project, you can select the project you wish to work on from the drop-down menu (cf the green square on the above image).
Instances
The Openstack Documentation defines instances as
Instances are virtual machines that run inside the cloud.
In other terms, an instance in an OpenStack context is simply a VM. When creating an instance, you should usually provide the following information:
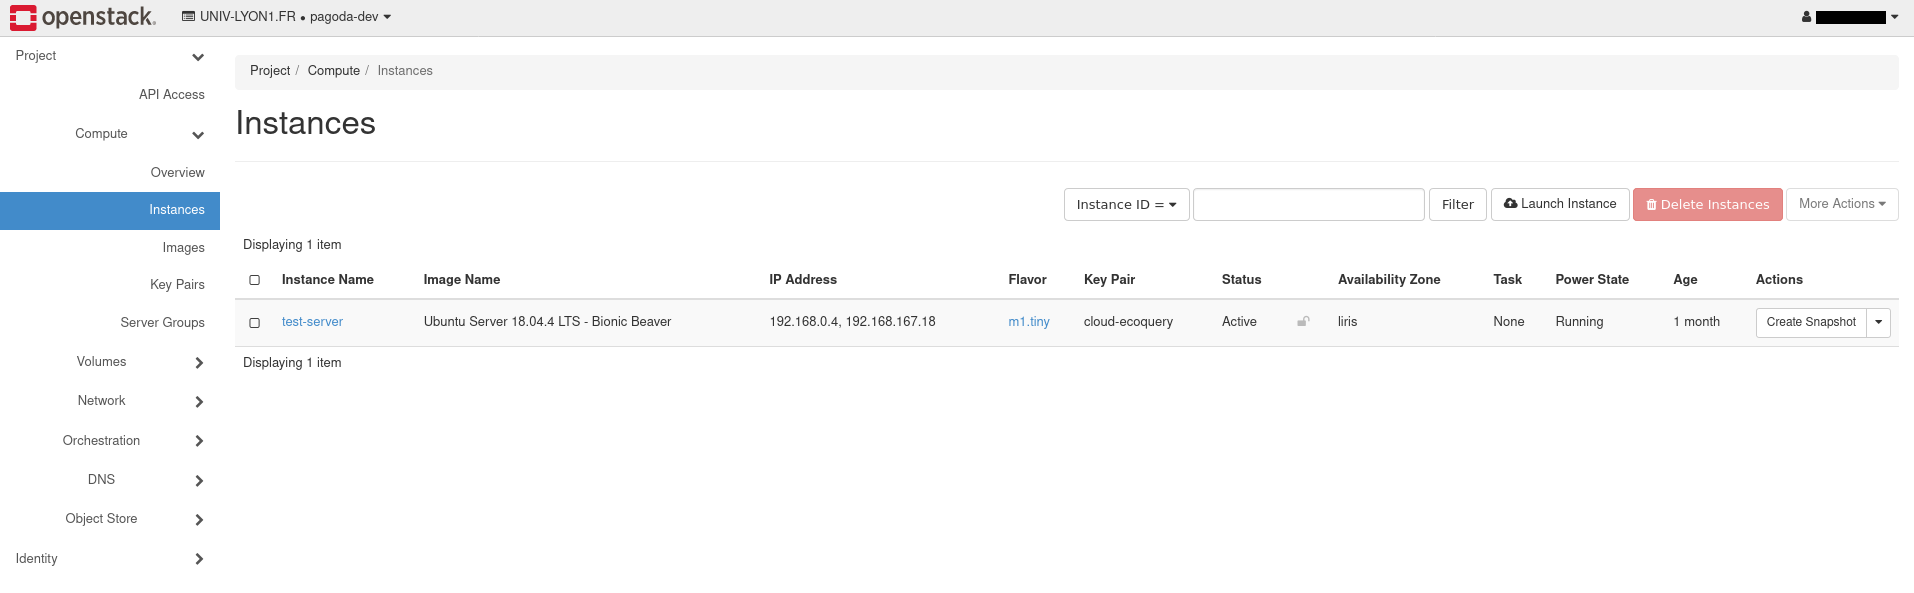
The list of deployed instances can be accessed from Compute > Instances on the left sidebar of the webUI as illustrated below:
Images
An image, in OpenStack terminology, is a single file that contains a virtual
disk with a bootable operating system installed on it.
This can be seen as an .iso file
that are usually used to install an operating system on a new computer.
Some images are provided by your OpenStack administrator but an end-user can also create its own images.
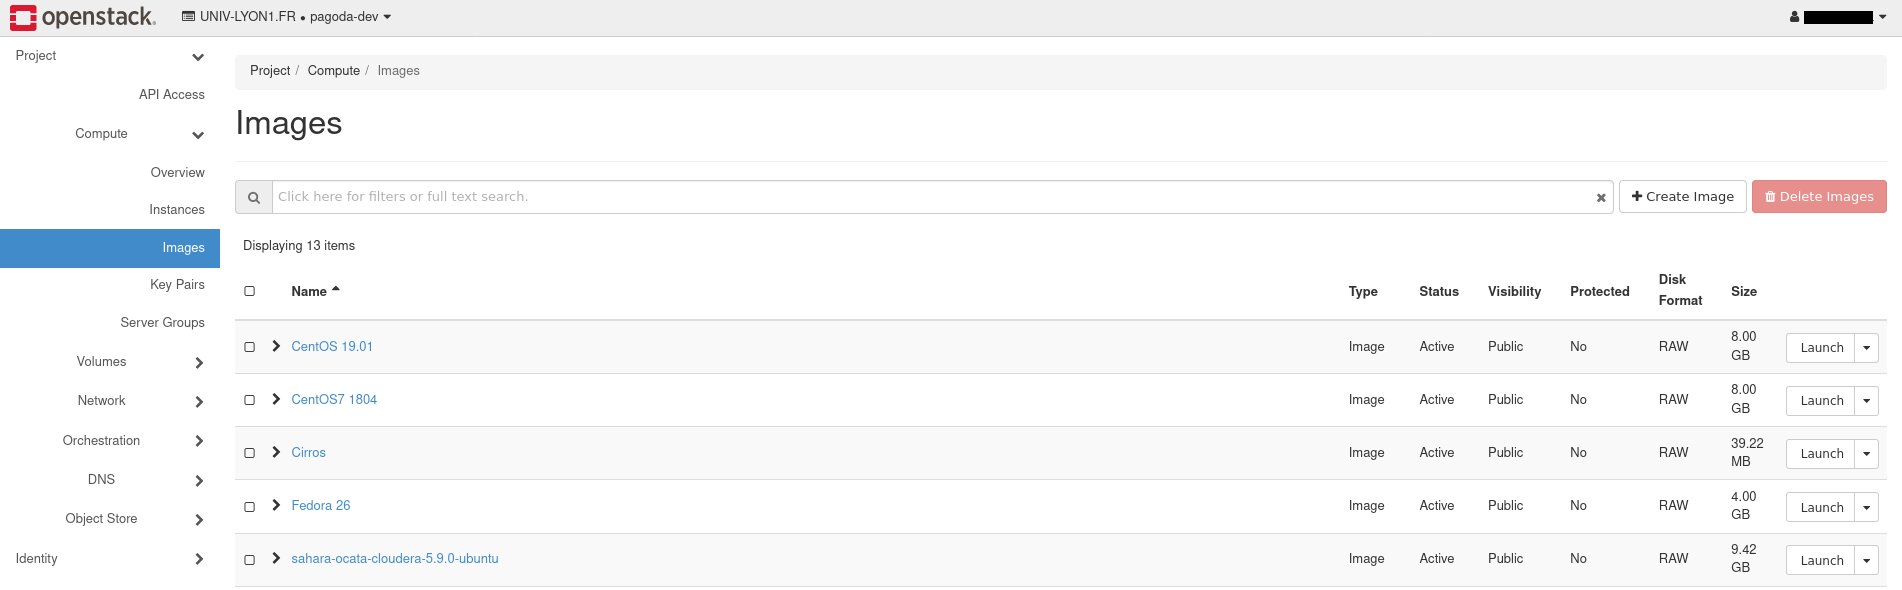
Available images are listed within the Compute > Images tab on the left sidebar of the webUI as illustrated on the image below:
Flavors
In OpenStack, a flavor defines the compute, memory, and storage capacity of a virtual server, also known as an instance. As an administrative user, you can create, edit, and delete flavors.
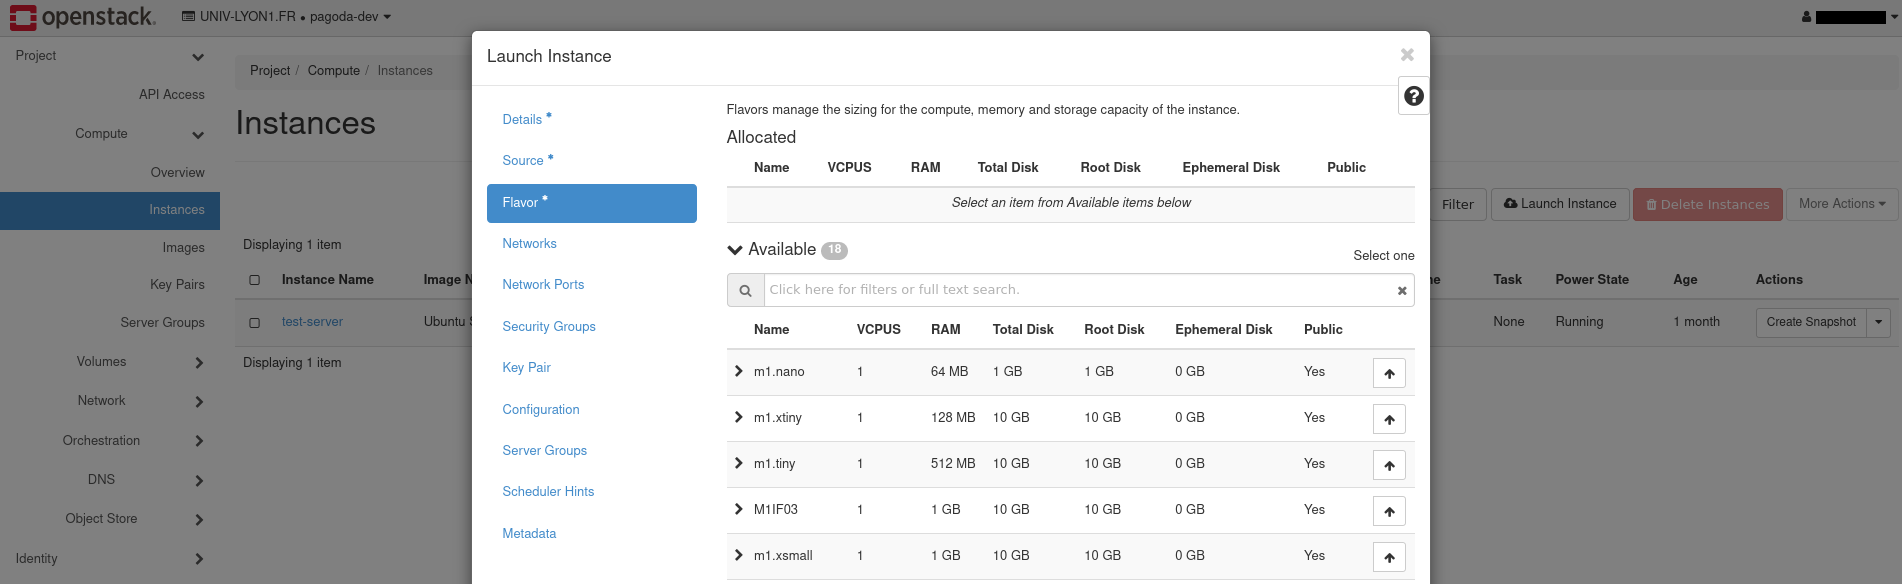
The list of available flavors are only accessible when creating an instances as shown below:
Keypair
From Openstack Documentation:
The badly named keypair is really the public key of an OpenSSH key pair to be used for access to created servers. You can also create a private key for access to a created server by not passing any argument to the keypair create command.
Before being able to set a keypair for an instance, it is recommended to ensure this keypair was previously registered at the project level.
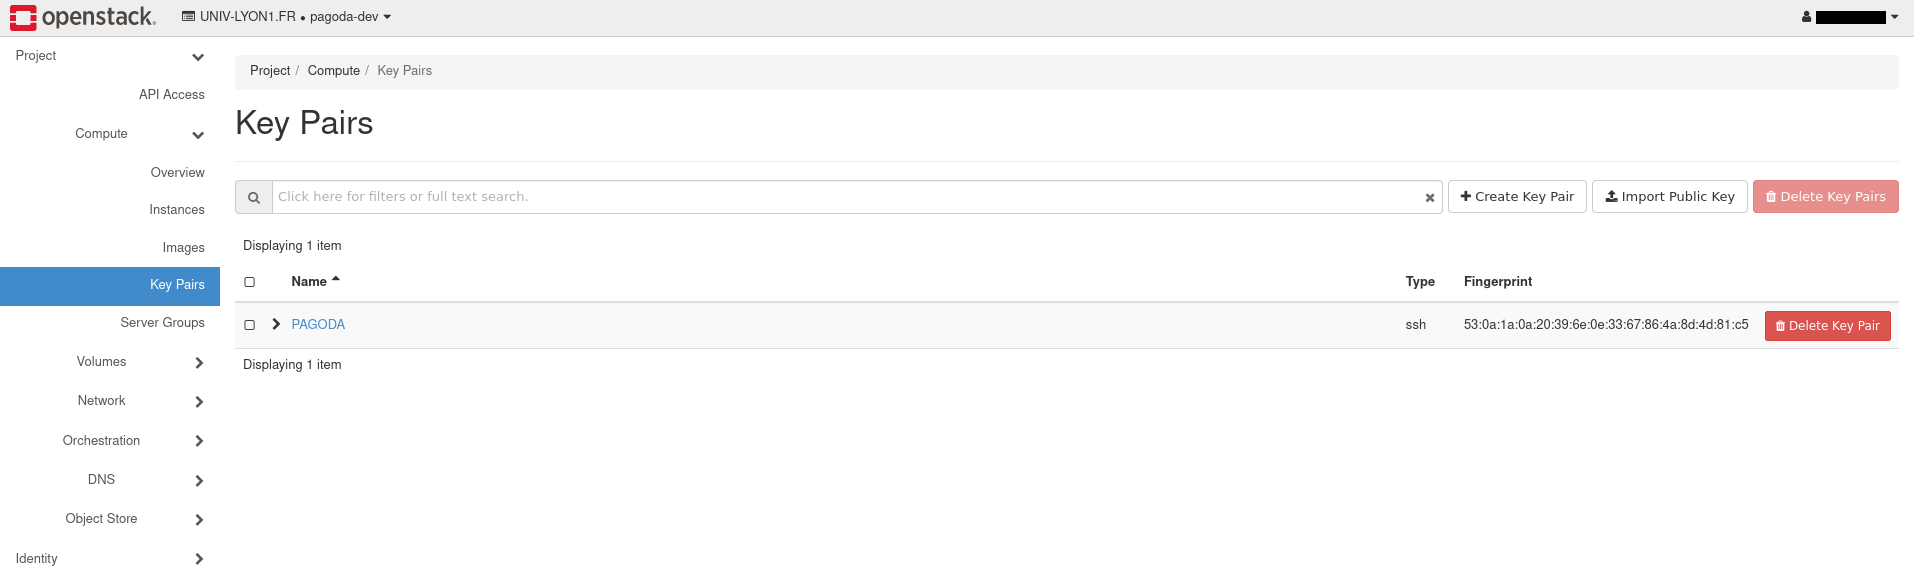
Available keypairs are accessed from Compute > Key Pairs tab entry on the left sidebar of the webUI as shown below:
Volumes
A volume is a detachable block storage device, similar to a USB hard drive. You can attach a volume to only one instance. Use the openstack client commands to create and manage volumes.
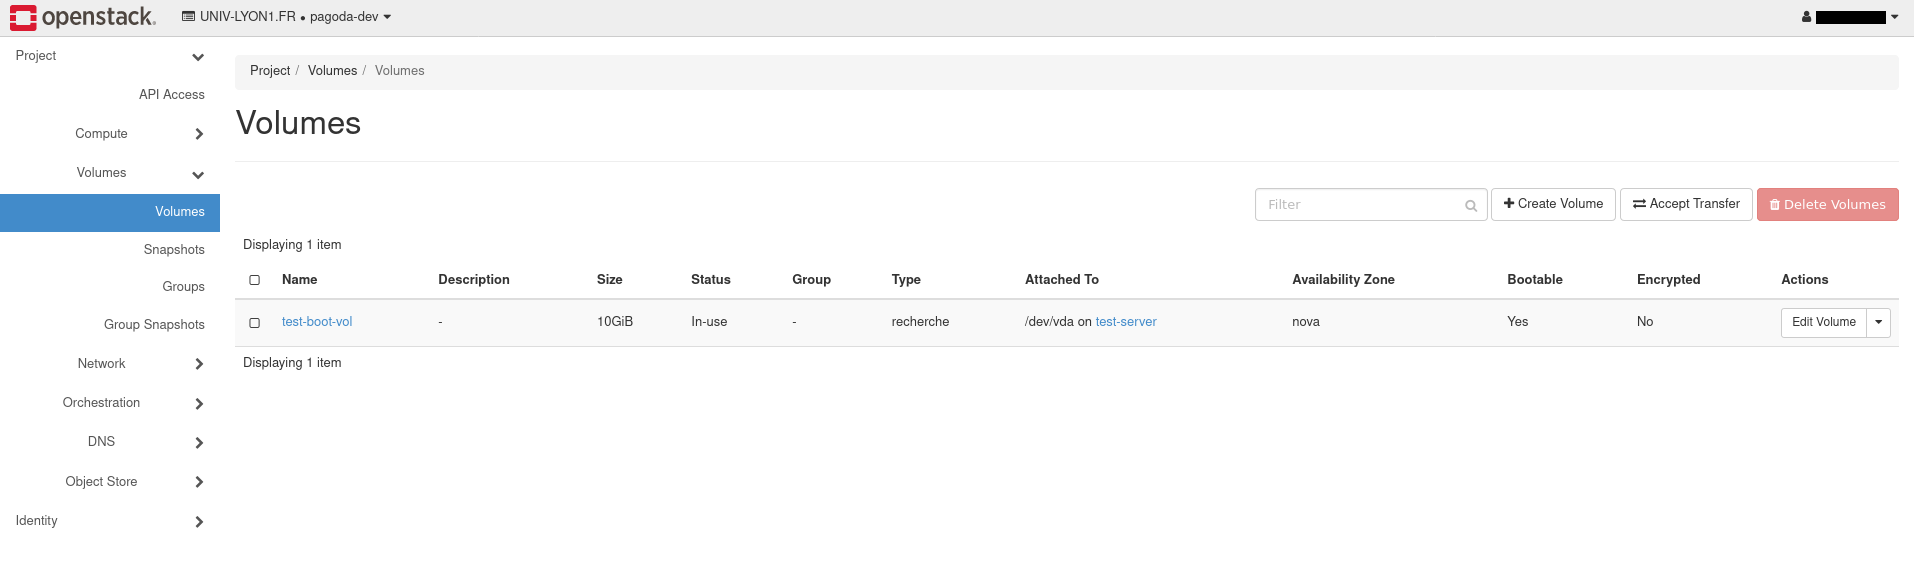
List of created volumes (whether used or not) are accessed from Volumes > Volumes from the left sidebar of the webUI as shown below:
DNS
From Openstack Documentation:
The Networking service offers several methods to configure name resolution (DNS) for instances.
Depending on your Openstack administrator, you might have access to a DNS service provided by openstack. This service will allow you to manage the DNS entries (also called recordset) for your instances.
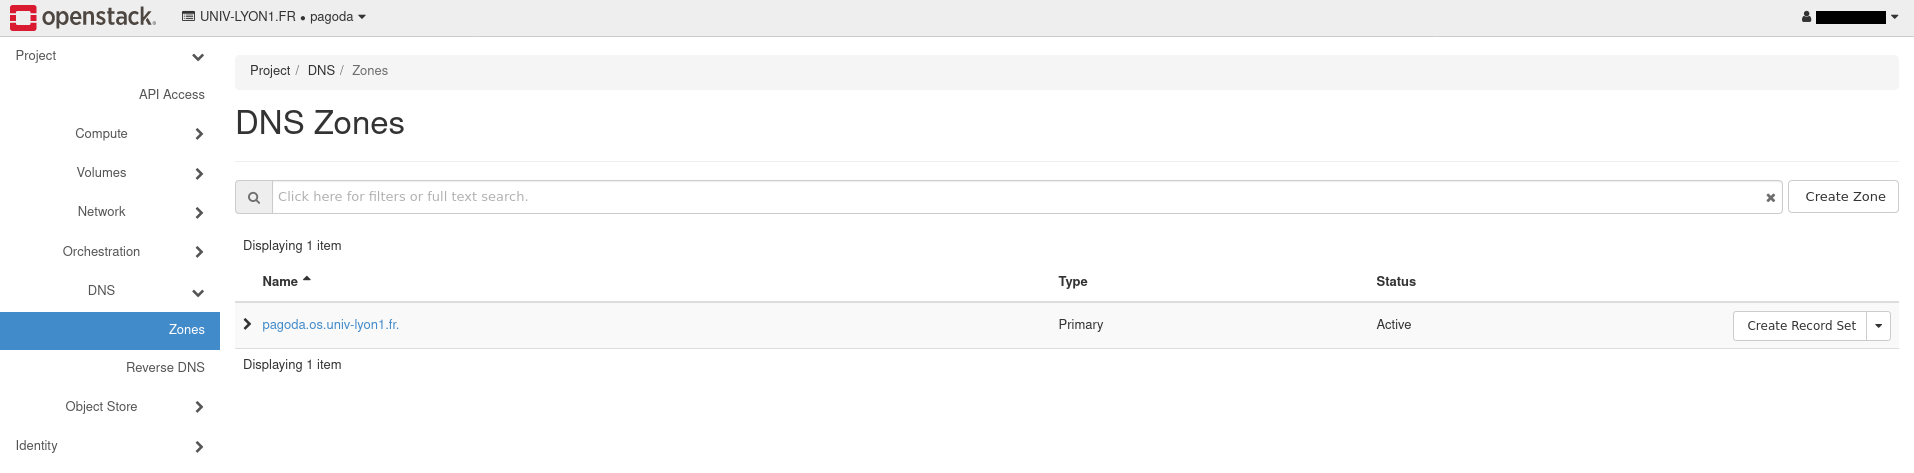
Configured domain and recordset are accessible from DNS > Zones On the left sidebar of the webUI as show below:
Stacks
A stack is a collection of OpenStack managed resources assembled by the execution of a template. These templates are called "Heat Openstack Templates" or HOT.
Using a stack is an advanced OpenStack usage that requires you to be at ease (and have some practice) with the previously described notions.
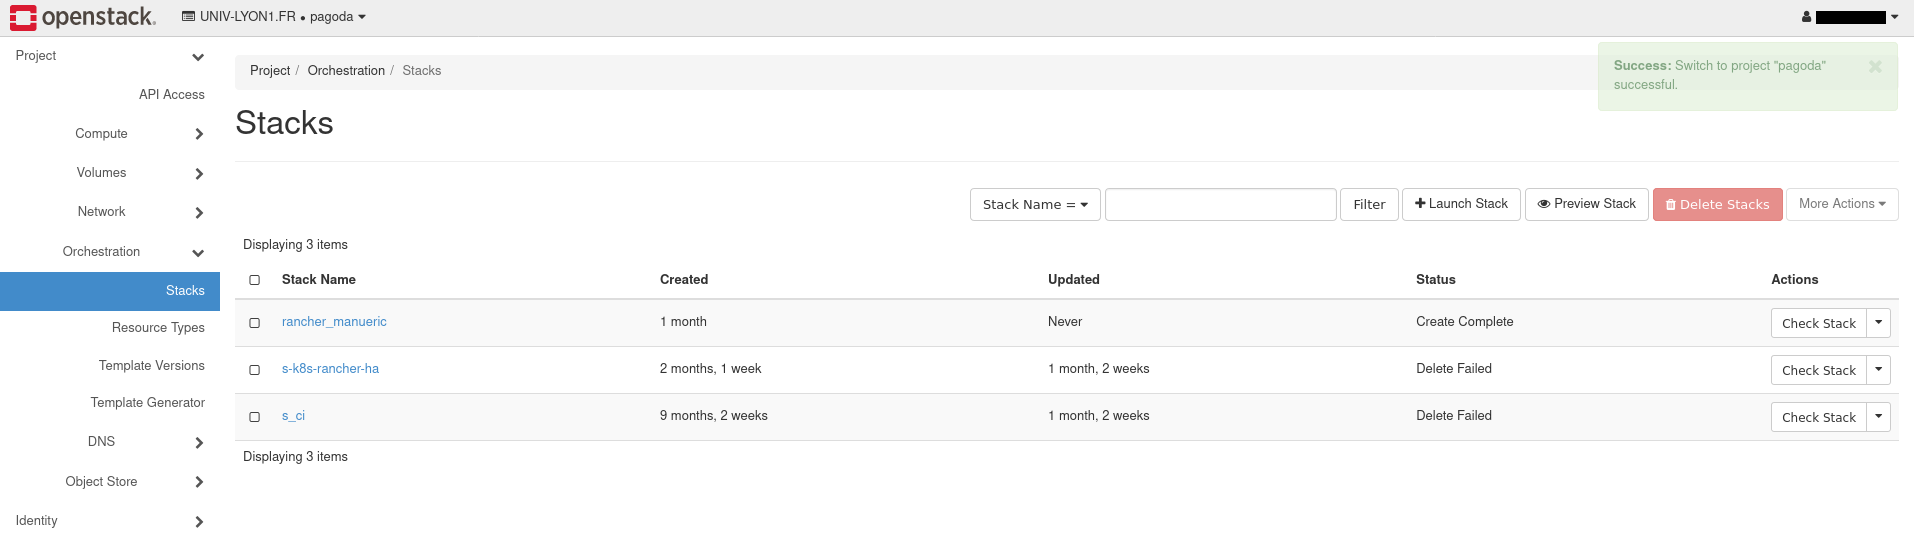
Deployed stacks are accessible from Orchestration > Stacks on the left sidebar of the webUI as shown below:
MOST OF THE ABOVE FEATURES ARE REQUIRED TO DEPLOY A PAGoDA INSTANCE
If your OpenStack admin did not enable them, for instance if the DNS service is missing, please ask the admin to enable them. Otherwise the PAGoDA deployment might fail.
Tutorials
Assumptions
The following tutorials assume that:
- You already installed the requirements described in the Local Software Requirements section.
- You were given access to a project within an Openstack service where the above described features (instance, image, flavor, stack…) are available.
Objectives
The following tutorials aim at making you familiar with basic usage of Openstack, especially to:
- Connect to your Openstack service through both the WebUI and the CLI.
- Create keypairs to be able to access to your instances.
- Deploy an instance.
- Create a DNS zone and associate DNS record to this zone for your instances.
- Create an image to reuse previously provisioned instances.
- Bulk creation resources through the usage of stacks.
These tutorials will not teach you how to install an Openstack service. OpenStack installation is not addressed in this documentation since deploying a PAGoDA instance assumes you already have at hand a properly configured cloud provider (Openstack in this case). Nor will these tutorials cover all possible features and options provided by the Openstack service (but only the subset required for deploying a PAGoDA instance).
For each tutorial both the graphical (via the webUI) and the command line (CLI) approach will be presented. When webUI illustrations are provided, the zones framed in green or red rectangles underline the locations where your modification should happen. Red rectangles further underline important modification zones. In opposition purple rectangles underline zones providing you with information, but where not intervention is expected from you.
Setup Openstack CLI
Before starting the tutorial, you will need to setup your computer to be able to communicate with your Openstack through the command line.
1. Setup the Openstack Client Command Line Interface (CLI)
The first task consists in installing on your desktop the CLI commands enabling the interactions with your Openstack instance (for this task we shall follow the Openstack Client documentation). There are two possibilities:
-
Your OS offers a openstackclient package (not recommended).
In this case, you could directly install this package system-wide. For instance, for ubuntu :
sudo apt-get install python-openstackclientand for OSX :
brew search openstackThat's it, the main CLI openstack is installed.
REMARK: This method is not recommended because it installs the commands at a system wide level as opposed to locating it at project (directory) level like python virtual environments offer it (refer below for that approach).
-
Install Openstack CLI in a python virtualenv environment.
Reminder: the local software requirements should be met.
First, create and activate a python3 virtual environment:
# Assuming we just test the connection, we just need a temporary folder
mkdir ~/temp
cd ~/temp
# Create a python virtual environment in folder `.env`
python3 -m venv .env
# Activate the python virtual environment
source .env/bin/activate
Then within this activated python virtual environment (which should be reflected by a change of your prompt), install the openstack client together with the external required modules.
pip3 install \
  python-openstackclient
  python-heatclient
  python-designateclient
  dnspython
The
openstackcommand should now be available available.Note : in order to "leave" (deactivate) the python virtual environment, use the following command (which should restore your original prompt):
deactivateREMARK: For each repository of PAGoDA project or to deploy a PAGoDA instance, this step is recalled in the instructions provided within the Installation - Setup Working Directory.
2. Download openrc.sh file and ensure connection
The second thing to do is to download what is usually called the openrc.sh
file. It is a simple shell script designed to setup environment variables
(within the shell of your terminal) to be able to communicate with your Openstack.
To get this file, connect to the web interface of your openstack. Then on the top right corner, click on your username name to show the drop-down menu and select the option "Openstack RC File" as shown below:

This will ask you where to download a file OS_PROJECT_NAME-openrc.sh, in
the example above, the project name is pagoda-dev and the corresponding
openrc.sh file is pagoda-dev-openrc.sh.
Do not hesitate to check the content of the file to understand which variables the script exports.
To activate the environment variable, you will just have to source the
previously downloaded openrc.sh file. In our example, it is
pagoda-dev-openrc.sh:
# Assuming we are in the directory where the file is :
source pagoda-dev-openrc.sh
# You will be asked for the password associated to your username:
Please enter your OpenStack Password for project pagoda-dev as user username:
# Type your password and press enter
You should now be ready to work with your Openstack from the CLI.
Now let us ensure that the communication, between your computer and your OpenStack service, is effective by e.g. listing the available (OpenStack) images:
openstack image list
You should have an output looking like the following table:
+--------------------------------------+-------------------------------------------+--------+
| ID                                   | Name                                      | Status |
+--------------------------------------+-------------------------------------------+--------+
| ca89d641-5b15-4bd9-9255-8be53ce8b993 | CentOS 19.01                              | active |
| f621e36f-4098-4753-b26e-94457bc65c6f | CentOS7 1804                              | active |
| 7afc938b-bbe3-49d7-aa6f-184396fc4a3e | Cirros                                    | active |
| 7dbe6096-fb1a-4cd7-a262-776e06470c7b | Fedora 26                                 | active |
| d10ced3c-cb91-42d4-a7c4-1da438a2fb36 | Supervision-2020                          | active |
| 57cddb19-aac2-4e32-911d-e7f03421c481 | Ubuntu 16.04.3 LTS Xenial                 | active |
| ffc281ea-4150-43e4-872e-e9043cf7a933 | Ubuntu 18.04.1 - LDAP - sudo all          | active |
| 248f8b2e-5d93-4c37-886d-958d9f3595a6 | Ubuntu 18.04.2 - Cuda 10.1                | active |
| 672e4791-af48-4607-bc30-55ecceeb4379 | Ubuntu Server 18.04.4 LTS - Bionic Beaver | active |
+--------------------------------------+-------------------------------------------+--------+
If the above command fails the most probable reason is that the provided password (when sourcing the openrc.sh) was erroneous.
Otherwise (on success), you can proceed to the next tutorials without leaving the python virtual environment.
Setting up a Keypair
Now that you have access to the OpenStack service both at the CLI and webUI levels, let us add an OpenStask keypair into your accounts and then use such a keypair to connect to your instance through SSH.
Create an SSH Key
Create SSH Key
First, you will need to create a private and a public SSH key. This can be done with the following command:
ssh-keygen -f "${HOME}/.ssh/id_rsa_openstack" -t rsa -b 4096 -C "Usefull comment"
DO NOT FORGET TO :
- replace
"Usefull comment"with some explicit string documenting what will be the usage of that key e.g."SSH Key for Openstack VM access" - choose a filepath name "
${HOME}/.ssh/id_rsa_openstack" that does not already exist (otherwise it will be overwritten). For example you might use a filename referring to your project name e.g.${HOME}/.ssh/ssh_rsa_os_project_name. The only constraint is that that filepath has to be${HOME}/.ssh. In the following documentation, we shall assume that the give filepath name is${HOME}/.ssh/id_rsa_openstack.
At the prompt, type a secure passphrase. This passphrase will be required when adding the SSH key to the SSH agent.
> Generating public/private rsa key pair.
> Enter passphrase (empty for no passphrase): [Type a passphrase]
> Enter same passphrase again: [Type passphrase again]
It is strongly recommended to choose an passphrase to secure your SSH key. If no passphrase is associated to your SSH key, if a malicious person get access to your unsecured SSH key, he/she will be able to load your SSH key and access to all your servers. Nevertheless if you chose to provide an empty passphrase (by hitting return), then adding the SSH key to your SSH agent will simply not prompt you for a password.
This will create two files:
${HOME}/.ssh/id_rsa_openstack: The private key${HOME}/.ssh/id_rsa_openstack.pub: The public key
Adding the SSH key to the SSH agent
Now, in order to be able to connect to your server using SSH, you have two possibilities:
- Explicit providing of the SSH key to be used
- Adding the SSH key to your SSH agent (recommended)
Explicit providing of the SSH key to use
Assuming you already have a server (properly configured to allow remote
connections with the SSH protocol), with e.g. IP address e.g. 10.0.0.10,
then you can connect to this server with the following command:
ssh -i ~/.ssh/id_rsa_openstack user@10.0.0.10
You should then be asked to provide the passphrase associated to the SSH key:
Enter passphrase for key '${HOME}/.ssh/id_rsa_openstack':
Type the passphrase and press Enter, this should connect you to your server.
Adding the SSH key to your SSH agent (recommended)
In order to repeatedly (each time you connect) having to provide the SSH key you can add such a key (once for the duration of the working session) to your SSH agent. To do this, first ensure that your ssh-agent is properly started:
ssh-agent -l
This command should display the SSH keys already registered by your SSH agent with an output of the form:
The agent as no identities
# or
4096 SHA256:+AAAAAAAAAAAAAAAAAAAAAAAAAAAAAAAAAAAAAAAAAA id_rsa (RSA)
But if you have get the following output
Error connecting to agent: No such file or directory
then this means that your SSH agent was not already running and you will first need to start it (in a background mode) with:
eval "$(ssh-agent -s)"
> Agent pid 59566
Once your asserted that your SSH agent is properly running, add your previously generated key to it:
ssh-add ~/.ssh/id_rsa_openstack
Enter passphrase for /home/<username>/.ssh/id_rsa_openstack:
Identity added: /home/<username>/.ssh/id_rsa_openstack (Useful comment)
If you set up a passphrase, you will be asked to provide it (as illustrated above). Once this done, ensure you key is added to your SSH agent:
ssh-add -l
4096 SHA256:AAAAAAAAAAAAAAAAAAAAAAAAAAAAAAAAAAAAAAAAAAA Useful comment (RSA)
You can now add this SSH key to your Openstack keypair to be able to provide this SSH key at the creation stage of an Openstack instance (the instance will embark that key in order to allow for later ssh connection to that instance).
Setting up a keypair from the webUI
Connect to your OpenStack webUI and select Compute > Key Pairs on the left side bar. Then click on "Import Public Key" as illustrated in the following picture:

Then choose an explicit name for the key that will be shown in your
Openstack, select SSH Key as Key Type and finally click on the
Browse button.
Then choose the public key associated to your previously generated key
(usually ending up with .pub extension: within this tutorial the
generated filepath name is ~/.ssh/id_rsa_openstack.pub).
This selection will automatically load the content of the given file
as illustrated in the purple rectangle in the image below.
After the key was uploaded, simply click on the
Import Public Key button to finish the importation.

Eventually, your keypair should appear within the list of available keypairs as illustrated below:

Setup keypair from CLI
In order to add a keypair to your Openstack using CLI, you simply need to enter the following command:
# Do not forget to update the path to your public key and the name of the
# keypair
openstack keypair create --public-key ~/.ssh/id_rsa_openstack.pub "My Keypair"
The output of the command should be similar to this:
+-------------+-------------------------------------------------+
| Field       | Value                                           |
+-------------+-------------------------------------------------+
| fingerprint | 3f:3f:9c:55:b9:a6:c9:db:5b:35:46:9c:04:07:3d:bc |
| name        | My Keypair                                      |
| user_id     | 2b38eaed6edc4b1f9c6cd00de6a93647                |
 +-------------+-------------------------------------------------+
In order to check whether the new keypair was properly imported to your Openstack, simply list the registered keypairs:
openstack keypair list
The above command should output an array as shown below:
+------------+-------------------------------------------------+
| Name       | Fingerprint                                     |
+------------+-------------------------------------------------+
| My Keypair | 3f:3f:9c:55:b9:a6:c9:db:5b:35:46:9c:04:07:3d:bc |
+------------+-------------------------------------------------+
Setting up a instance
Now that a keypair is set up, let us start a simple instance (or server).
Start a simple instance from the WebUI
Within the webUI, first go to Compute > Instances, then select the Launch Instance button.

An overlay window should appear allowing you to specify the parameters of the instance you want to start. First provide the so-called "details" about the instance, such as the instance name as well as a brief description:

Then on the left side, select the Source entry in order to prescribe the base image you want to use for your instance. First click on the "Select Boot Source" drop-down menu (refer to the green rectangle of the below illustration) and select image. Then, within the list of available images (refer to the purple rectangle in the illustration below), select some image suiting your needs by clicking on the "up arrow" icon (refer to the green square at the bottom right of the illustration).

Then, in order to prescribe the flavor of your instance, select the Flavor entry on the left side of the window. As for the image selection, you must pick up your flavor among the list of available ones (refer to the illustration's purple rectangle) by clicking on the "up arrow" icon of your choice (refer to the green square of the illustration).

Proceed with selecting the Networks entry, on the left side of the window, in order to describe the network within which your instance will be spawned. If your project offers only a single network then this network might already be selected for you. Otherwise, you should select a network within the list of available ones as you similarly did for images and flavors.

Eventually the last required step consists in choosing a keypair for your instance. Still on the left side, click on the keypair entry. As for networks, if you only have a single registered keypair then you are done (as illustrated below). Otherwise, you have to choose some keypair. If you omit to configure a keypair then your server will not be (easily) accessible via SSH and hence will be hard to reach (they are other means for configuring an ssh server within an instance but they are beyond the scope of this tutorial).

If you feel like it, you can explore the other entries, on the left sidebar of the overlay window, that correspond to specific/advanced usages (generally not mandatory to deploy an instance) that won't be addressed during this tutorial.
You can now click on the Launch Instance button at the very bottom of the overlay window to start your instance. Just after clicking on this button, you should land on the list of spawned instances within which you should recognize the instance you just created (with a spawning progress bar within the "Task" column) as illustrated below:

Once available, status of your server should be automatically updated as shown below:

Normally, you should be able to access your server via SSH through a command of the form:
# If you do not add your private key to your SSH agent
ssh -i ~/.ssh/id_rsa_openstack user@server.ip
where
- user is the user name that was allowed for ssh access when you build the considered image (the image you have chosen for your instance) and
- server.ip is the IP of your server/instance as shown in the output of
the command
openstack server list.
If the SSH access to your server/instance fails, the usual troubleshooting list goes
- if you defined a passphrase for your key then make sure that you provided the correct one,
- make sure no firewall is blocking your access (maybe you forgot to launch your vpn?)
- your server/instance may require a floating IP.
A floating IP is required when your Openstack manager configured your project in such a manner that servers/instances in your project are not visible (in terms of IP connectivity) from outside the (openstack internal) network to which servers/images are attached. Such an openstack administration choice might be due e.g. to a lack of IP.
If a floating IP happens to be required for your (openstack) project then you must explicitly provide a floating IP for your server/instance. In order to do so, click on the drop-down menu on the right in the line of your server and then select Associate Floating IP.

An overlay window should appears in which you will need to select the floating IP you want to associate to your server from a drop-down menu. Then click on the Associate

You should end up on your server list in which you will see that your server/instance now has two IPs, one being the floating IP.

Start a simple server from CLI
To create a server from the CLI, you will first need to gather some information, such as the available images, flavors, networks and keypairs.
To gather available images, type the following command:
openstack image list
+--------------------------------------+-----------+--------+
| ID                                   | Name      | Status |
+--------------------------------------+-----------+--------+
| 09053fe6-4d62-454f-8a6c-e86aa9e04e2d | Debian 10 | active |
| 0952c28f-25e7-4ec0-8787-324d4461c184 | cirros    | active |
+--------------------------------------+-----------+--------+
The above command lists the available images: select and note the name of the image you will want to use as base image for your server/instance.
REMARK If you have two images with the same name, then in order to disambiguate them, do not use the image name but instead use the image ID of the image you wish to use.
You will then need to repeat the process for flavors, networks and keypairs:
# Gather available flavors
openstack flavor list
+--------------------------------------+-------+------+------+-----------+-------+-----------+
| ID                                   | Name  |  RAM | Disk | Ephemeral | VCPUs | Is Public |
+--------------------------------------+-------+------+------+-----------+-------+-----------+
| 45c45efc-19dc-43d1-823c-4d0f0b1ff721 | c1.r2 | 2048 |   20 |         0 |     1 | True      |
| 499ae44c-2424-429a-88d6-11957bbce177 | c1.r1 | 1024 |   20 |         0 |     1 | True      |
+--------------------------------------+-------+------+------+-----------+-------+-----------+
# Gather available networks
openstack network list
+--------------------------------------+----------+--------------------------------------+
| ID                                   | Name     | Subnets                              |
+--------------------------------------+----------+--------------------------------------+
| 4c63841e-829d-4585-bc12-90aa7df99db1 | external | 2196fed2-bae9-4987-a22a-45d4201d4f2a |
| ee2a08c6-590c-4e5c-acac-2d13210914ad | test     | 036f6b68-2352-4b87-8f3e-7420d79a2c23 |
+--------------------------------------+----------+--------------------------------------+
# Gather available keypairs
openstack keypair list
+------------+-------------------------------------------------+
| Name       | Fingerprint                                     |
+------------+-------------------------------------------------+
| My Keypair | 3f:3f:9c:55:b9:a6:c9:db:5b:35:46:9c:04:07:3d:bc |
+------------+-------------------------------------------------+
Once you have chosen all the required information you can start a new server/instance with the following command:
# DO NOT FORGET TO REPLACE VALUES BETWEEN '<>' WITH VALUES YOU HAVE CHOSEN
# EARLIER
openstack server create \
  --flavor <FLAVOR_NAME> \
  --image <IMAGE_NAME>    \
  --network <NETWORK_NAME> \
  --key-name <KEYPAIR_NAME> \
  <SERVER_NAME>
For instance, using some of the above retrieved values:
openstack server create   \
  --flavor c1.r1          \
  --image "Debian 10"     \
  --network test          \
  --key-name "My Keypair" \
  "Debian 10 Test"
This should display an output of the form:
+-------------------------------------+--------------------------------------------------+
| Field                               | Value                                            |
+-------------------------------------+--------------------------------------------------+
| OS-DCF:diskConfig                   | MANUAL                                           |
| OS-EXT-AZ:availability_zone         |                                                  |
| OS-EXT-SRV-ATTR:host                | None                                             |
| OS-EXT-SRV-ATTR:hypervisor_hostname | None                                             |
| OS-EXT-SRV-ATTR:instance_name       |                                                  |
| OS-EXT-STS:power_state              | NOSTATE                                          |
| OS-EXT-STS:task_state               | scheduling                                       |
| OS-EXT-STS:vm_state                 | building                                         |
| OS-SRV-USG:launched_at              | None                                             |
| OS-SRV-USG:terminated_at            | None                                             |
| accessIPv4                          |                                                  |
| accessIPv6                          |                                                  |
| addresses                           |                                                  |
| adminPass                           | 33uhAnsHhKq5                                     |
| config_drive                        |                                                  |
| created                             | 2020-09-03T09:10:00Z                             |
| flavor                              | c1.r1 (499ae44c-2424-429a-88d6-11957bbce177)     |
| hostId                              |                                                  |
| id                                  | 95c7c357-d145-4d87-bc2a-1e67bce35af9             |
| image                               | Debian 10 (09053fe6-4d62-454f-8a6c-e86aa9e04e2d) |
| key_name                            | My Keypair                                       |
| name                                | Debian 10 Test                                   |
| progress                            | 0                                                |
| project_id                          | fe0e65a952724a5aac45a7d5057c050f                 |
| properties                          |                                                  |
| security_groups                     | name='default'                                   |
| status                              | BUILD                                            |
| updated                             | 2020-09-03T09:09:59Z                             |
| user_id                             | 2b38eaed6edc4b1f9c6cd00de6a93647                 |
| volumes_attached                    |                                                  |
+-------------------------------------+--------------------------------------------------+
To ensure that your server/instance is up and running, type the following command:
openstack server list
+--------------------------------------+----------------+--------+-----------------------------------+-----------+--------+
| ID                                   | Name           | Status | Networks                          | Image     | Flavor |
+--------------------------------------+----------------+--------+-----------------------------------+-----------+--------+
| 95c7c357-d145-4d87-bc2a-1e67bce35af9 | Debian 10 Test | ACTIVE | test=192.168.222.230              | Debian 10 | c1.r1  |
| b866b1f2-69d4-408c-bb48-455c9744dd5a | Debian Test    | ACTIVE | test=192.168.222.93, 10.20.20.181 | Debian 10 | c1.r1  |
+--------------------------------------+----------------+--------+-----------------------------------+-----------+--------+
Normally, you should be able to access your server via SSH through a command of the form:
# If you do not add your private key to your SSH agent
ssh -i ~/.ssh/id_rsa_openstack user@server.ip
where
- user stands for the user name that was allowed for ssh access when you build the considered image (the image you have chosen for your server/instance) and
- server.ip is the IP of your server/instance as shown in the output of
the command
openstack server list.
If the SSH access to your server/instance fails, the usual troubleshooting list goes
- if you defined a passphrase for your ssh key then make sure that you provided the correct one,
- make sure no firewall is blocking your access (maybe you forgot to launch your vpn?)
- your server/instance may require a floating IP.
A floating IP is required when your Openstack manager configured your project in such a manner that servers/instances in your project are not visible (in terms of IP connectivity) from outside the (openstack internal) network to which servers/images are attached. Such an openstack administration choice might be due e.g. to a lack of IP.
If a floating IP happens to be required for your (openstack) project then you must explicitly provide a floating IP for your server/instance. In order to do so from the CLI, first discover what floating IP addresses are available with the command
openstack floating ip list
Then select some available floating IP and associate it to your server/instance with a command of the form
openstack server add floating ip <your_server_name> <selected_floating_IP>
You can assert things went smoothly by checking the available IP addresses
attached to your server/instance with the openstack server list command.
You should now be able to ssh to your server/instance through this newly associated floating IP address.
Setup a server with boot from volume
On the previous tutorials, we have created a simple server instance. As you may have noticed, your server does not have a lots of available disk space. In the above example, it only had 20GB. You may want to have more disk space for your server, for instance 100GB. If you are the openstack administrator you could create a new flavor to do so. Yet creating a new flavor is most often not the recommended way to do so. A alternative way consists in
- creating an openstack volume that suits your size requirements,
- configuring this volume to be "bootable",
- choosing the image you want,
- write that image on the volume you just created.
Then you will be able to boot a server/instance out of that bootable volume.
This is the process that is described in detail in the following tutorial.
Boot from volume from WebUI
The first thing to do is to create the volume which will store the base image. For this, within your WEbUI, go to Compute > Volume and click on the Create Volume button.

An overlay window should appear. Within this window you should provide a volume name and a description. Then, in the drop-down menu Volume Source, select Image. The overlay window should update and propose you a new drop-down menu Use image as a source. In this drop-down menu, select the image you want to use (in the example below, we "Cirros" was chosen). Then, depending on your Openstack instance, you may be required to select a volume type: please refer to your Openstack administrator for more information concerning the volume types that are allowed within your Openstack instance. Eventually, enter the size of the volume you want (in the example, we chose 25GB) and click on Create Volume

Once done, the volumes sub-menu should be updated and the volume you just created should be displayed as illustrated below:

Now, let us start a server to boot from this volume. Fort this, go to Compute >Instance, then click on Launch Instance.

An overlay window should appear: this tutorial will now focus on the source section as opposed to other section that were previously presented the Setup a simple server tutorial (and for which you can keep the entry values presented there).
In this "source" section, and in the drop-down menu, instead of choosing image (as was done in Setup a simple server tutorial), choose the volume entry as illustrated below.
The list of available bootable volumes should update itself, showing the volume you previously created. Proceed with selecting this previously created volume to be used as boot volume. If you wish this volume to be deleted when the server/instance will be destroyed, then set the Delete Volume on Instance Delete option to true. When doing so, keep in mind that the volume content will of course be lost.
Once the configuration of the server is done, click on Launch Instance.

You can now get back to the list of deployed servers/instances and assert that your newly created server does indeed appear. If within that list you select your instance/server, and you explore the displayed data of its "Overview" tab, you should then encounter a "Volumes Attached" entry (mentioning the volume you used).

Boot from volume from CLI
The first thing to do will be to create the volume which will store the base image. Hence before starting we will need to list the available images. This can be done with the following command:
openstack image list
The command will output something like shown below:
+--------------------------------------+-------------------------------------------+--------+
| ID                                   | Name                                      | Status |
+--------------------------------------+-------------------------------------------+--------+
| f621e36f-4098-4753-b26e-94457bc65c6f | CentOS7 1804                              | active |
| 7afc938b-bbe3-49d7-aa6f-184396fc4a3e | Cirros                                    | active |
| 57cddb19-aac2-4e32-911d-e7f03421c481 | Ubuntu 16.04.3 LTS Xenial                 | active |
| ffc281ea-4150-43e4-872e-e9043cf7a933 | Ubuntu 18.04.1 - LDAP - sudo all          | active |
| 672e4791-af48-4607-bc30-55ecceeb4379 | Ubuntu Server 18.04.4 LTS - Bionic Beaver | active |
+--------------------------------------+-------------------------------------------+--------+
For our example, we will use Cirros image name. Remark: if you have
two images with the same name, you can disambiguate them by using their
respective image ID in place of their (shared) image name.
Depending on your Openstack configuration, you might have multiple types of
volumes available (you might have for instance defined a dev and a prod
architecture).
Please refer to your Openstack manager to learn what the respected volume
types that were configured are done for.
In order tT list the available volume type, use the following command:
openstack volume type list
The above command should output something like:
+--------------------------------------+-----------+-----------+
| ID                                   | Name      | Is Public |
+--------------------------------------+-----------+-----------+
| 2174e347-ece8-4d4a-8142-dd028a66b635 | pedagogie | True      |
| d8696854-615b-4204-8fb6-7038f863539f | recherche | False     |
+--------------------------------------+-----------+-----------+
In our example, we have two volume types which were labeled pedagogie
(dedicated to educational purposes) and recherche (dedicated to research
purposes.
We will use the recherche volume type since this is research project.
We can now create the volume with the following command:
# Replace values between <>
openstack volume create --bootable --image <IMAGE_NAME> --size <SIZE_IN_GB> --type <VOLUME_TYPE> "<VOLUME_NAME>"
In our example, we want a boot volume of 25GB using Cirros as base image,
using the recherche volume type. This volume will be called "Volume Test
Tuto CLI". So the command will be:
openstack volume create --bootable --image Cirros --size 25 --type recherche "Volume test tuto CLI"
+---------------------+------------------------------------------------------------------+
| Field               | Value                                                            |
+---------------------+------------------------------------------------------------------+
| attachments         | []                                                               |
| availability_zone   | nova                                                             |
| bootable            | false                                                            |
| consistencygroup_id | None                                                             |
| created_at          | 2020-09-04T11:10:08.000000                                       |
| description         | None                                                             |
| encrypted           | False                                                            |
| id                  | b29e68b9-737b-4875-bb62-62007a58f186                             |
| multiattach         | False                                                            |
| name                | Volume test tuto CLI                                             |
| properties          |                                                                  |
| replication_status  | None                                                             |
| size                | 25                                                               |
| snapshot_id         | None                                                             |
| source_volid        | None                                                             |
| status              | creating                                                         |
| type                | recherche                                                        |
| updated_at          | None                                                             |
| user_id             | dba142203fd084bed473010aacbcf5fe8b104c0bfdc549fe920bc162e42c781f |
+---------------------+------------------------------------------------------------------+
Check that your volume is available:
openstack volume list
+--------------------------------------+----------------------------+-----------+------+------------------------------------------------+
| ID                                   | Name                       | Status    | Size | Attached to                                    |
+--------------------------------------+----------------------------+-----------+------+------------------------------------------------+
| b29e68b9-737b-4875-bb62-62007a58f186 | Volume test tuto CLI       | available |   25 |                                                |
| 203b2142-ec8b-4bd1-8ad5-902dfc78bb5c | Boot Volume Tuto Openstack | in-use    |   25 | Attached to Boot From Volume Tuto on /dev/vda  |
| 6736682d-3d63-49eb-adfa-f75333eae629 | test-boot-vol              | in-use    |   10 | Attached to test-server on /dev/vda            |
+--------------------------------------+----------------------------+-----------+------+------------------------------------------------+
Now that your volume is created, you can start a server/instance using this volume as boot volume. Yet creating a server/instance also requires some available flavor as well as a keypair. You can list the availabe flavors with the following command:
openstack flavors list
The above command should output something like:
+--------------------------------------+-------------+-------+------+-----------+-------+-----------+
| ID                                   | Name        |   RAM | Disk | Ephemeral | VCPUs | Is Public |
+--------------------------------------+-------------+-------+------+-----------+-------+-----------+
| 0                                    | m1.nano     |    64 |    1 |         0 |     1 | True      |
| 04f8b52c-64df-4807-beb4-66e0eac663c7 | c4.large    |  8192 |   10 |         0 |     4 | True      |
| 1b29b21c-0158-4afe-8ddf-82c7a1c51b58 | m1.xtiny    |   128 |   10 |         0 |     1 | True      |
| 31c88641-3ae3-49e7-8156-40bec63ac6d8 | M1IF03      |  1024 |   10 |         0 |     1 | True      |
| 38af1736-e2da-4e1b-bdeb-4b8fd6186bc9 | m1.medium   |  4096 |   10 |         0 |     2 | True      |
| 5b2a3a16-107c-428c-afdd-28c23fd11bb8 | m1.large    |  8192 |   10 |         0 |     4 | True      |
| 65690170-043a-48f1-9d7f-3c9b940574f1 | m1.xsmall   |  1024 |   10 |         0 |     1 | True      |
| 7e7c8b5f-798c-4e7e-a584-54cf18209047 | c12.giant   | 65536 |   10 |         0 |    12 | True      |
| a1f42d75-efd6-42ba-b31f-76dc5e0770d0 | m1.small    |  2048 |   10 |         0 |     1 | True      |
| a506fc36-01b2-4014-a502-7bc0d93f9bb4 | Kali2       |  4096 |   20 |         0 |     4 | True      |
| b4979998-6534-4a10-a40d-1a48304f33e1 | c4.medium   |  4096 |   10 |         0 |     4 | True      |
| b84933ad-2740-4a6a-a0c5-35a324e210d8 | 8to8        |  8192 |   10 |         0 |     8 | True      |
| bee5501a-d11d-4c41-8c6c-d8cb82390987 | c12.large   |  8192 |   10 |         0 |    12 | True      |
| c2cc3399-6bd9-437e-a8f5-d00d1e5f1763 | cloudera    | 16384 |  100 |         0 |     2 | True      |
| e4cecd05-1e0c-414b-a301-7a404f904b34 | m1.tiny     |   512 |   10 |         0 |     1 | True      |
| f10c142a-5a29-42d0-873f-8277df847fa0 | m1.xlarge   | 16384 |   10 |         0 |     8 | True      |
| f49b751a-4bba-47cb-ab3d-d3599ee66e75 | m1.XLmemory | 32768 |   10 |         0 |     4 | True      |
| fc5ad50d-4c17-43e8-b4ed-f76c4159bf46 | m1.smedium  |  4096 |   10 |         0 |     1 | True      |
+--------------------------------------+-------------+-------+------+-----------+-------+-----------+
In our example, we will use the m1.small flavor. We must also choose a
keypair to be able to access our server/instance via SSH once created.
The list of available keypairs is obtain with the following command:
openstack keypair list
Which output should be like:
+------------+-------------------------------------------------+
| Name       | Fingerprint                                     |
+------------+-------------------------------------------------+
| My Keypair | 3f:3f:9c:55:b9:a6:c9:db:5b:35:46:9c:04:07:3d:bc |
+------------+-------------------------------------------------+
We now have at hand all the information required for the creation of server/instance using a bootable volume. The creation itself can be done with a command of the form
# Replace value between <>
openstack server create --volume "<VOLUME_NAME>" --flavor "<FLAVOR_NAME>"
--key-name "<KEYPAIR_NAME>" "<SERVER_NAME>"
For our example, we will call our server "Server Test Boot Volume CLI", and hence the creation command will be:
openstack server create --volume "Volume test tuto CLI" --flavor m1.small --key-name "My Keypair" "Server Test Boot Volume CLI"
Finally, check that your server is started:
openstack server list
+--------------------------------------+-----------------------------+--------+----------------------------------------------+-------+-----------+
| ID                                   | Name                        | Status | Networks                                     | Image | Flavor    |
+--------------------------------------+-----------------------------+--------+----------------------------------------------+-------+-----------+
| 47c365d5-88f9-49fe-a0e5-a24f2202e590 | Server Test Boot VOlume CLI | ACTIVE | vlan-pagaoda-dev=192.168.0.175               |       | m1.small  |
| abaed2d0-556f-4c6b-87bf-542e919de2e6 | Boot From Volume Tuto       | ACTIVE | vlan-pagaoda-dev=192.168.0.51                |       | c4.medium |
| bbf51668-17b9-4f50-9c37-572f8e27f29e | test-server                 | ACTIVE | vlan-pagaoda-dev=192.168.0.4, 192.168.167.18 |       | m1.tiny   |
+--------------------------------------+-----------------------------+--------+----------------------------------------------+-------+-----------+
Create a snapshot image
You now know how to create a server/instance and your usual next step may
consist in
provisioning
it.
For instance, you may have to install proxy settings or some utility tools like
htop or vim, etc.
Such provisioning might be required for every server that you manage (or a
subset of them) rapidly making such a provisioning step quite a repetitive
task for you.
Hopefully, OpenStack provides convenient means for you to create Image based on existing servers. In this tutorial, we will see how to create an instance snapshot (a type of image) of a server to be later used directly as base image (note that OpenStack offers other ways to conveniently create an Image).
In the following tutorial, we will assume that you already have a provisioned
server/instance, called Boot From Volume Tuto, out of which you want to make
a snapshot image.
Create snapshot from WebUI
The first this to do is to open the Compute > Instances tab in order to list all servers instances you have.

Then on the right hand side of the server instance from which you want to create a snapshot (to be used as Image), click on the drop down menu and select Create a snapshot. You will be directed to a new window in which you will be prompted to provide a name for the (snapshot) image resulting from this snapshot process.

Once satisfied with your name hit the Create snapshot button.
Finally, go to the Compute > Images tab to ensure that your resulting (snapshot instance) image exists:

Create snapshot from CLI
To create a snapshot from a server/instance from the CLI, you will first need to gather the name and/or the uuid of the server instance from which you want to create a snapshot image.
To gather available server instances, type the following command:
openstack server list
+--------------------------------------+-----------------------+--------+-----------------------------------+-----------+--------+
| ID                                   | Name                  | Status | Networks                          | Image     | Flavor |
+--------------------------------------+-----------------------+--------+-----------------------------------+-----------+--------+
| 95c7c357-d145-4d87-bc2a-1e67bce35af9 | Boot From Volume Tuto | ACTIVE | test=192.168.222.230              | Debian 10 | c1.r1  |
+--------------------------------------+-----------------------+--------+-----------------------------------+-----------+--------+
Then to create the associated snapshot image, you simply need to type the following command:
openstack server image create -name <image name> <server instance name or uuid>
In our case our snapshot image will be called Image Tuto and its name or
uuid are provided in the output of the previous command, so the command
will be :
# Using the server instance name
openstack server image create -name "Image Tuto" "Boot From Volume Tuto"
# Using the server instance uuid
openstack server image create -name "Image Tuto" "95c7c357-d145-4d87-bc2a-1e67bce35af9"
Finally, ensure your image was created using the following command:
openstack image list
+--------------------------------------+------------+--------+
| ID                                   | Name       | Status |
+--------------------------------------+------------+--------+
| 09053fe6-4d62-454f-8a6c-e86aa9e04e2d | Debian 10  | active |
| 0952c28f-25e7-4ec0-8787-324d4461c184 | cirros     | active |
| 0952c28f-25e7-4ec0-8787-1234567890ab | Image Tuto | active |
+--------------------------------------+------------+--------+
Now that the snapshot (image) is registered as an image in OpenStack, you can use it as any other image (such as described e.g. in Setup simple server) to create new servers/instances.
Important
When an OpenStack manager creates an image, it is important for the used flavor to be as small as possible. This is because when using an image created with a snapshot process, such a snapshot image will require that your server/instance resources (number of CPU, size of base volume, RAM quantity) to be at least those used when creating the image.
For example, if you create a snapshot image from a server/instance that was defined as using a flavor characterized with 2 CPU, a volume of 10 Go and 8 Go of RAM, then every server/instance using that snapshot image will require at least the same amount of resources (as the original used flavor).
Later in this documentation, in the Packer section, you will learn how to create a "true" (as opposed to a snapshot image) Openstack automatically provisioned image i.e. you will not need to manually spawn a server and provision it in order to finally make a snapshot of it. But such a true/direct (Packer powered) image creation will required you to first read and learn the Ansible section for you to be comfortable with the usage of ansible that, within the PAGoDA project, is used by Packer as provisioning tool.
Create a DNS zone and configuring it
Sometimes, the custom services that you will deploy with Openstack will
require a properly configured DNS service.
This is because you might wish to refer to your servers with their names
(as opposed to their dynamically given IP address) in order to simplify the
configuration of services.
For example, the Rancher tool (especially for its high-availability
deployment) requires the availability of a DNS service (as opposed to
configuring its /etc/host file).
This is what the Openstack DNS service is able to provide.
In this tutorial, we will see how to create a DNS zone with Openstack and how to configure such a zone by adding (DNS) records.
Create a DNS zone
The first thing to do is to define a zone (usually corresponding to a sub domain name, refer to the difference between a DNS zone and DNS domain) in your DNS service within Openstack. Before continuing, please consult your Openstack manager in order to know
- how many DNS zones you will be allowed to define (and what constraints apply to each such a zone e.g. the number of record sets and record per zone),
- the sub-domain name for which your are allowed to create a DNS zone.
For example, in the Openstack instance used to develop PAGoDA, each
(OpenStack) project is only allowed to create a single DNS zone
corresponding to a sub-domain of the .os.univ-lyon1.fr. domain.
Once you have this information, you can proceed with this tutorial.
From the WebUI
First, go to DNS > Zones, an click on Create Zone button:

An overlay window should appear prompting you for the following information:
- The name of the sub-domain you wish to define (notice that this
sud-domain, as every domain name, MUST END WITH A DOT
.character): for examplepagoda_dev.os.univ-lyon1.fr. - An email address (contact for the sub-domain responsible organization/person),
- The Time To Live parameter,
- The type of the DNS zone.
The description information is optional. Please fill the previously cited fields. If you do not know which values you should set for in the TTL and the type of DNS zone fields then just keep the default values.

Once submitted, the interface should get you back to the DNS > Zone panel which should now be updated with your newly created DNS zone.

From the CLI
In CLI, to create a DNS zone, you simple have to type the following command:
openstack zone create --email "<email@adress>" --description "<description> <dns_zone_name>"
If we use the same values as taken in the WebUI tutorial, the command to be used for this example will be :
# DO NOT FORGET THE DOT `.` AT THE END OF THE TLD.
openstack zone create --email "contact@email.tld" --description "A simple description" "pagoda-dev.os.univ-lyon1.fr."
+----------------+--------------------------------------+
| Field          | Value                                |
+----------------+--------------------------------------+
| action         | CREATE                               |
| attributes     | {}                                   |
| created_at     | 2016-07-13T14:54:16.000000           |
| description    | None                                 |
| email          | contact@email.tld                    |
| id             | 14093115-0f0f-497a-ac69-42235e46c26f |
| masters        |                                      |
| name           | pagoda-dev.os.univ-lyon1.fr.         |
| pool_id        | 794ccc2c-d751-44fe-b57f-8894c9f5c842 |
| project_id     | 656bc359067844fba6005d400f19df76     |
| serial         | 1468421656                           |
| status         | PENDING                              |
| transferred_at | None                                 |
| ttl            | 3600                                 |
| type           | PRIMARY                              |
| updated_at     | None                                 |
| version        | 1                                    |
+----------------+--------------------------------------+
Finally, ensure that the DNS zone was indeed created with the following command:
openstack zone list
+--------------------------------------+------------------------------+---------+------------+--------+--------+
| id                                   | name                         | type    |     serial | status | action |
+--------------------------------------+--------------------+---------+------------+--------+--------+
| 14093115-0f0f-497a-ac69-42235e46c26f | pagoda-dev.os.univ-lyon1.fr. | PRIMARY | 1468421656 | ACTIVE | NONE   |
+--------------------------------------+------------------------------+---------+------------+--------+--------+kj
Create a Record Set entry
Once the DNS zone is defined, you will need to enter "record sets", in
order for instance to define an address record (for some specific
host offering a service) within the considered sub-domain.
In this section you will learn how to create such a record set by creating
an item of a record set that attributes a domain name
www.pagoda-dev.os.univ-lyon1.fr to the IP address of a server hosting
some web service.
Important
A record set is attached to a DNS Zone. Without any DNS zone, you won't be able to create a DNS record set.
From the WebUI
First you will need select the DNS > Zone tab and select the zone
for which you want to add a record set.
In our example, we will take pagoda-dev.os.univ-lyon1.fr. as DNS Zone.

You should land on a more detailed view of your DNS Zone. On this page, click on Create Record Set:

You will be prompted, through an overlay window, for the following information:
- The
record set type
e.g.
A,AAAA,TXT, etc. - The name of the record set, in our example this will be
www.pagoda-dev.os.univ-lyon1.fr. - (optional) A description of the record set
- The TTL (Time To Live) of the record set
- The record of the record set, i.e. the value associated to the
record set type. For instance for a
Atype record set, the value will be an IP (v4) number.
In our example we will assume that IPv4 number of our server is
192.168.42.125, so we will fill the fields of the record set as
illustrated below:

Once the entries are provided, click on the Submit button and this action will bring you back to the detailed view of your DNS Zone.
Finally, ensure your record set was properly created by clicking on the Record Sets tab on the detailed view:

From the CLI
From the CLI, you will first need to gather the name of the zone for which you want to add a recordset which can be done with the following command:
openstack zone list
+--------------------------------------+------------------------------+---------+------------+--------+--------+
| id                                   | name                         | type    |     serial | status | action |
+--------------------------------------+--------------------+---------+------------+--------+--------+
| 14093115-0f0f-497a-ac69-42235e46c26f | pagoda-dev.os.univ-lyon1.fr. | PRIMARY | 1468421656 | ACTIVE | NONE   |
+--------------------------------------+------------------------------+---------+------------+--------+--------+kj
Then adding a recordset is done with a command of the form:
openstack recordset create --recordset <record> --type <type> <dns_zone_id> <recordset name>
Remark that you can provide either a zone ID or a zone name to designate the concerned DNS zone. Applied to our example, the command will be:
openstack recordset create --recordset 192.168.42.125 --type A pagoda-dev.os.univ-lyon1.fr www.pagoda-dev.os.univ-lyon1.fr.
+-------------+--------------------------------------+
| Field       | Value                                |
+-------------+--------------------------------------+
| action      | CREATE                               |
| created_at  | 2016-04-19T17:51:12.000000           |
| description | None                                 |
| id          | 180d3574-3c29-4ea2-b6ff-df904bd3f126 |
| name        | www.pagoda-dev.os.univ-lyon1.fr.     |
| records     | 192.0.2.20                           |
| status      | PENDING                              |
| ttl         | None                                 |
| type        | A                                    |
| updated_at  | None                                 |
| version     | 1                                    |
| zone_id     | 388814ef-3c5d-415e-a866-5b1d13d78dae |
+-------------+--------------------------------------+
Finally, ensure that your recordset exists with the following command:
openstack recordset list <dns_zone_id>
Applied to our example, this will give:
openstack recordset list pagoda-dev.os.univ-lyon1.fr.
and yes the trailing dot character matters !