


User documentation / Author : Martial Tola
MEPP interface
The MEPP interface consists of 4 main parts:
- the upper part consisting of the menu bar and different toolbars,
- the left side with the components dock,
- the right side containing the explorer meshes dock,
and,
- finally the central part where the meshes are displayed and manipulated according to the "MDI parent and child windows" model.
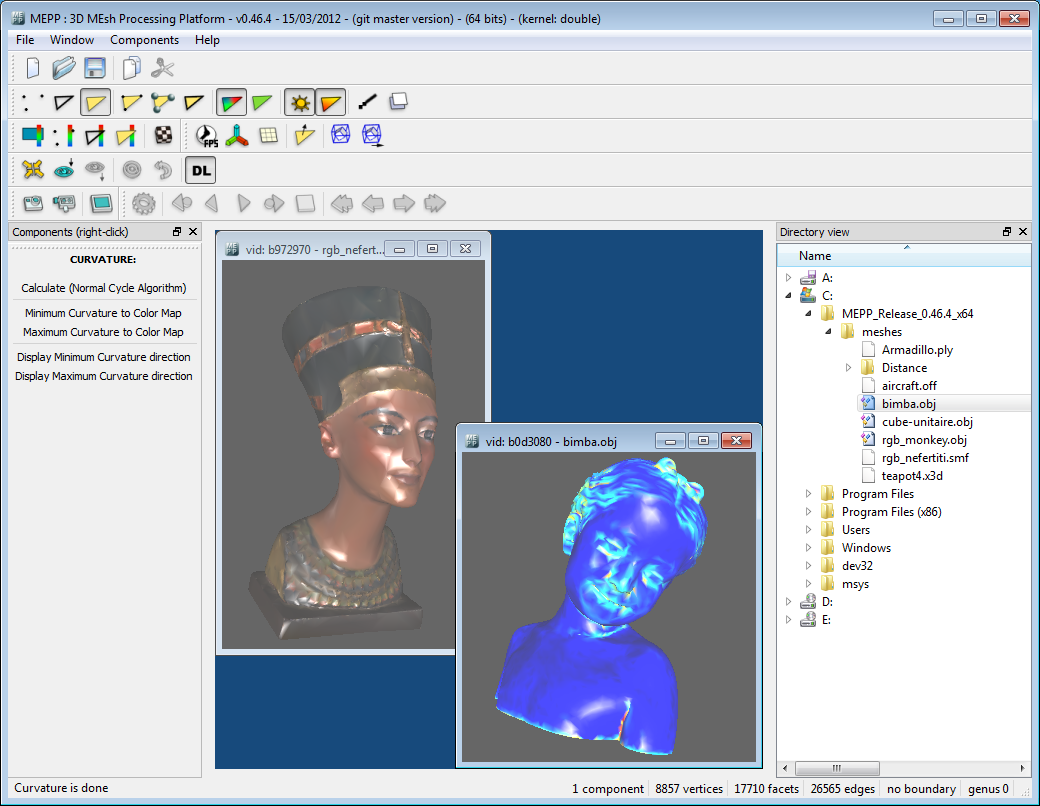
Table of contents
1. Loading of one or more meshes
2. Manipulation of one or more meshes
3. Presentation of the menu bar
3.1. "File" menu
3.2. "Windows" menu
3.3. "Components" menu
3.4. "Help" menu
4. Toolbars presentation
4.1. "File" toolbar
4.2. "Viewer" toolbar
4.3. "Color" toolbar
4.4. "Show" toolbar
4.5. "View" toolbar
4.6. "Capture" toolbar
4.7. "Time" toolbar (only in "time" mode)
5. Components dock presentation
6. Explorer meshes dock presentation
7. Context menu presentation
8. QGLViewer specific features
9. MEPP application and viewer (child window) settings
1. Loading of one or more meshes
1.1. Loading a mesh in MEPP can be done in two ways, either using the "File/Open..." menu (or the corresponding button "Open") or by "drag & drop" from the explorer on the right side of the application.
The MEPP supported formats are: ".off", ".obj", ".smf", ".ply" and ".x3d".
MEPP uses three specific modes of display and manipulation for meshes:
- the "normal" mode in which a child window contains only one mesh,
- the "space" mode in which a child window contains 2 to n meshes in the space,
and finally,
- the "time" mode in which a child window contains 2 to n meshes in time.
The classic loading and opening presented above corresponds to the "normal" mode.
1.2. Loading multiple meshes in "space" mode can also be done in two ways, either using the "File/Open (space)..." menu or by "drag & drop" holding the right mouse button* after selecting multiple meshes in the explorer on the right side of the application and then releasing the mouse button in the central area of the application.
1.3. Loading multiple meshes in "time" mode can also be done in two ways, either using the "File/Open (time)..." menu or by "drag & drop" holding the right mouse button* and the "alt" key (on Windows and Mac OS X) or the "meta" key ie "the Windows key" (on Linux) after selecting multiple meshes in the explorer on the right side of the application and then releasing the mouse button in the central area of the application.
* Under Mac OS X, the right mouse button is replaced by the left mouse button with the "ctrl" key.
1.4. The addition of one or more meshes to the current child window in "space" mode is done using the "File/Open and Add (space)..." menu or with the same "drag & drop" mechanism mentioned above (see 1.2.) but this time releasing the mouse button in the desired child window.
1.5. Similarly, the addition of one or more meshes to the current child window in "time" mode is done using the "File/Open and Add (time)..." menu or with the same "drag & drop" mechanism mentioned above (see 1.3.) but this time releasing the mouse button in the desired child window.
2. Manipulation of one or more meshes
2.1. In a child window, the mesh can be rotated by holding the left mouse button. It can be moved by holding the right mouse button and then it is possible to zoom in/out on it using the mouse wheel in one direction or another.
If multiple meshes are present in a child window (mode "space"), you must first select a mesh by left-clicking while holding the "shift" key and then manipulate the selected mesh (rotation, translation, zoom) like it was mentioned above,
but holding down the "ctrl" key (on Windows and Linux) or the "cmd" key ie "the Apple key" (on Mac OS X).
2.2. Closing a child window is achievable in 4 different ways, either using the "File/Close" menu, or by using the "Window/Close" menu, or by right-clicking on the desired child window and then selecting "Close" from the context menu, or finally using the classic "window close" red cross on the top right of the child window in question.
3. Presentation of the menu bar
3.1. "File" menu
- "New" : opens a child window with a simple tetrahedron.
- "Open..." : see 1.1.
- "Open (space)..." : see 1.2.
- "Open (time)..." : see 1.3.
- "Open and Add (space)..." : see 1.4.
- "Open and Add (time)..." : see 1.5.
- "Save As..." : allows you to save and export a mesh in the ".off" (with or without color and normal information), ".obj" or ".wrl" (VRML) format.
- "Close" : allows you to close the current child window.
- "Copy/Clone current mesh" : allows you to copy and clone a selected mesh from a child window to another one.
- "Delete current mesh (in Space or Time mode)" : allows you to remove a mesh from the selected child window (this feature is only available in "space" or "time" mode).
- "Exit" : exits MEPP.
3.2. "Windows" menu
- "Close" : allows you to close the current child window.
- "Close All" : allows you to close all child windows.
- "Tile" and "Cascade" : classic presentation of all child windows as "tile" or "cascade".
- "Next" and "Previous" : respectively allows you to move to the next or previous child window.
- "Change MDI View Mode (-> to Tabbed View / -> to SubWindow View)" : allows you to change the MDI display mode by switching from the classic "child windows" display mode to the "thumbnails" display mode (and vice versa).
- "Change Viewer Mode (-> to Time / -> to Space)" : allows you to switch between "space" to "time" mode (and vice versa).
- then comes the list of all child windows opened, a click on the name of one of them activates the child window in question.
3.3. "Components" menu
This menu is an access by categories and subcategories for specific functions of each component loaded as dynamic library.
Note : only components whose dynamic library (".dll", ".so", ".dylib") is present in the same folder as the MEPP executable are loaded, visible and usable.
3.4. "Help" menu
Provides information on versions of MEPP, Qt, QGLViewer and CGAL and a link to this help.
4. Toolbars presentation
4.1. "File" toolbar


- "New" : same as "File" menu.
- "Open..." : same as "File" menu.
- "Save As..." : same as "File" menu.
- "Copy/Clone current mesh" : same as "File" menu.
- "Delete current mesh (in Space or Time mode)" : same as "File" menu.
4.2. "Viewer" toolbar


- "Render Point" : only allows the rendering of vertex.
- "Render Line" : only allows the rendering of edges.
- "Render Fill" : only allows the rendering of facets.
- "Superimpose Vertices" : allows you to add the display of vertices.
- "Superimpose Vertices (bigger)" : allows you to add the display of vertices (but bigger).
- "Superimpose Edges" : allows you to add the display of edges.
- "Vertex Color Mode" : toggles the display to "vertex color" mode.
- "Face Color Mode" : toggles the display to "face color" mode.
Note : if neither of these two modes is activated, the display is done according to the material (see "Color" toolbar).
- "Lighting" : enables or not the lighting management (without light, the material is not shown).
- "Smooth Shading" : enables or not the "smooth shading".
- "Antialiasing" : enables or not antialiasing.
- "Culling" : enables or not culling (ie eliminate all polygons that are not turned to the camera).
4.3. "Color" toolbar


- "Background color" : allows you to change the background color.
- "Vertex color" : allows you to change the vertex color.
- "Edge color" : allows you to change the edges color.
- "Face color" : allows you to change the facets color.
- "Material" : allows you to change the material according to a choice from a predefined list.
4.4. "Show" toolbar


- "Show FPS" : displays bitrate.
- "Show axis" : displays the 3d axis.
- "Show grid" : displays the grid.
- "Show normals" : displays the normals.
- "Bounding box" : displays the bounding box of a mesh.
- "Bounding box when moving" : displays the bounding box of a mesh only when the mesh is manipulated (ie during rotations and translations).
4.5. "View" toolbar


- "Reset viewpoint for current mesh" : displays the mesh to its original orientation and to its original position.
- "Copy viewpoint" : allows you to copy the point of view from a child window.
- "Paste viewpoint" : allows you to paste the point of view ("copy/paste" viewpoint allows to have the same view in two different child windows).
- "Center all meshes (in Space mode)" : allows you to center all the meshes (only in "space" mode).
- "Coupling rotations (in Space mode)" : allows you to couple rotations of all the meshes (only in "space" mode).
- "'Display Lists' mode" : enables or not the OpenGL "Display Lists" mode and thus speed up the display especially for very large meshes.
4.6. "Capture" toolbar


- "Screenshot" : saves a ".png", ".eps", ".ps", ".ppm", ".bmp" or ".fig" file.
- "Screenshot sequence" : saves a "H.264/MPEG-4 AVC" video (with bitrate and fps settings).
- "Clipboard screenshot" : saves an image in the clipboard.
4.7. "Time" toolbar (only in "time" mode)


- "Params" : lets you choose the fps of the animation.
- "Reverse start loop" : allows you to "play" the animation in reverse, in loop.
- "Reverse start" : allows you to "play" the animation in reverse.
- "Start" : allows you to "play" the animation.
- "Start loop" : allows you to "play" the animation, in loop.
- "Stop" : allows you to "stop" the animation.
- "First" : allows you to position you at the beginning of the animation.
- "Previous" : used to move a "step" back in the animation.
- "Next" : used to move a "step" forward in the animation.
- "Last" : allows you to position you at the end of the animation.
Note on toolbars : right-click inside them allows you to disable or enable them.
5. Components dock presentation
Right-click in it allows you to display (or hide) a shortcut to the components most often used.
Note : all components are however usable via the "Components" menu.
6. Explorer meshes dock presentation
This is a rather classic file explorer, however it only displays MEPP supported formats (".off", ".obj", ".smf", ".ply" and ".x3d").
Note on components dock and explorer meshes dock : right-click on their title allows you to disable them.
Note : the two docks and all toolbars can also be disabled or enabled via a right-click on the MEPP main menu bar.
7. Context menu presentation
This menu can be activated by right-clicking in a child window.
It takes almost all the functions of the menu bar and toolbars and also the ability to select a mesh if either in "space" or "time" mode (see first menu "Pid", for 'Polyhedron id').
Moreover, in the "space" mode, this same first menu "Pid" can successively (1) select a mesh (focus), (2) hide a mesh (hide) and finally (3) redisplay again a mesh and give it the selection (unhide and focus).
8. QGLViewer specific features
In a child window, pressing the 'H' key displays a link to this help and the list of QGLViewer keyboard and mouse specific shortcuts.
Many things are interesting, more specifically the concept of "camera paths" that can be used with the "Screenshot sequence" functionality (see "Capture" toolbar).
9. MEPP application and viewer (child window) settings
mepp.ini and mepp_viewer.ini files can be opened and edited as text files so that the user can define specific settings.