![]()
Git-GitHub source code management in MEPP (Windows, Linux and Mac OS X guide) / Author : Martial Tola
![]()
![]()
![]()
Git-GitHub operating philosophy (IMPORTANT)
On github you fork the project you want to make changes too. Then you clone that project on your local machine and make your changes.
You then push your changes back to your repository and send a pull request to the original project.
--> The merge between the two repositories (your repository and the main one) is done by ANOTHER DEVELOPER after a 'pull request' !
That is all you need to do to send in a patch, issue a pull request.
Table of contents
1. Setting up your account and get your working copy (your fork)
1.1. Create an account on github.com
1.2. Fork MEPP
2. Set up git
2.1. Under Linux and Mac OS X
2.2. Under Windows
3. Normal workflow
4. Edit files and commit in branches
5. Useful git commands
6. Resolving git conflict
7. Important things
8. See also
9. Tips
1. Setting up your account and get your working copy (your fork)
1.1. Create an account on github.com
- go to github.com, then 'Signup and Pricing' -> 'Free for open source' -> 'Create a free account'
- choose Username/Email/Password and it's done
- you can also update your account settings (website, avatar...)
1.2. Fork MEPP
Let's fork the initial MEPP repository. So, once you're logged in on github
- go to https://github.com/MEPP-team/MEPP
- click on the 'Fork' button
- once the fork is finished, you'll have your own copy of MEPP with the following path: https://github.com/yourUsername/MEPP
- at this URL, you're able to browse the sources, see the commit log, report issues...
2.1. Under Linux and Mac OS X
GitHub documentation is quite straightforward. The goal is to activate your account with a SSH-key to be able to 'push' changes to GitHub servers.
Under Linux, go to https://help.github.com/articles/set-up-git#platform-linux and then go to https://help.github.com/articles/generating-ssh-keys#platform-linux for generating SSH Keys.
Under Mac OS X, go to https://help.github.com/articles/set-up-git#platform-mac and then go to https://help.github.com/articles/generating-ssh-keys#platform-mac for generating SSH Keys.
2.2. Under Windows
Download and install the latest version of 'Git for Windows'
- go to http://code.google.com/p/msysgit/downloads/list and download 'Full installer for official Git for Windows'
- during this installation there are no special settings, just keep on clicking 'next' without changing anything
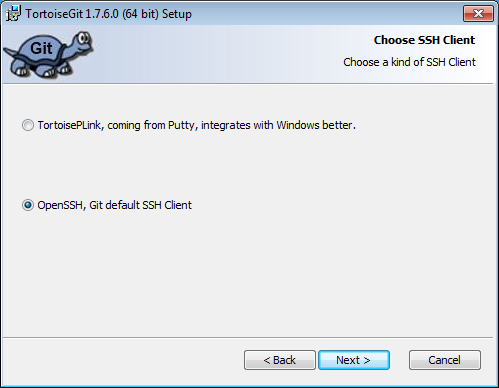
Download and install the latest version of 'TortoiseGit'
- go to http://code.google.com/p/tortoisegit/downloads/list and download 'TortoiseGit 32bit' ou 'TortoiseGit 64bit'
- during this installation you have to set some important settings, please be sure that you set them correctly
- 'Choose SSH Client' -> 'OpenSSH, Git default SSH Client'
- restart your computer if need
After the successful installation of both programs, continue with the generation of a public SSH-key.
The goal is to activate your account with a SSH-key to be able to 'push' changes to GitHub servers.
To do this just click 'Start' -> 'Programs' -> 'Git' -> 'Git GUI'
- just click 'Help' -> 'Show SSH-key' -> 'Generate a key' and if you want define a 'key passphrase' and confirm it
After it's done you see your freshly generated ssh public key.
Before closing the window, you must then copy the key out of the box and add it to your github account.
- on the GitHub site, click on your Username and then click 'Edit Your Profile' to see your 'Account Settings' (or more simply go to https://github.com/account)
- click then 'SSH Public Keys' -> 'Add another public key'
- choose a 'Title' for this key (for example, the name of your computer)
- now paste the key into the 'Key' field and click 'Add key'
3. Normal workflow
Set your name and email for working with 'TortoiseGit'
- right-click on your 'Windows Desktop' and select 'TortoiseGit' -> 'Settings' -> 'Git/Config'
- set your full name in the 'Name' field and the email that your using at GitHub in the 'Email' field
- finally click 'Apply' and then 'Ok'
Set remote repositories and get a local copy on your computer
Once you have fork the initial MEPP repository, you can clone your fork to have a local copy of your own (remote) copy of MEPP (git@github.com:yourUsername/MEPP.git).
With 'TortoiseGit':
- create an empty folder 'MEPP.git' (somewhere on your computer, for example 'C:\MEPP.git') and right-click on/into it
- choose 'Git Clone...', then set the Url to git@github.com:yourUsername/MEPP.git
- finally click 'OK' (answer 'yes' to the confirmation of 'github.com' authenticity and then enter your 'key passphrase' if asked)
Under a shell:
- cd /Desktop
- mkdir MEPP.git; cd MEPP.git
- git clone git@github.com:yourUsername/MEPP.git (answer 'yes' to the confirmation of 'github.com' authenticity and then enter your 'key passphrase' if asked)
In order to easily access to the initial MEPP repository (git@github.com:MEPP-team/MEPP.git), you can set it as a remote repository, called 'upstreamMEPP-team':
With 'TortoiseGit':
- right-click on/into folder 'C:\MEPP.git\MEPP' and select 'TortoiseGit' -> 'Settings' -> 'Git/Remote'
- set 'upstreamMEPP-team' in the 'Remote' field and 'git@github.com:MEPP-team/MEPP.git' in the 'URL' field
- finally click 'Add New/Save' and then 'Ok'
Under a shell:
- cd MEPP
- git remote add upstreamMEPP-team git@github.com:MEPP-team/MEPP.git
Git remotes are great because they allows to have multiple pull/push repositories. You can see the list of your remote repositories under a shell:
- git remote
- git remote -v
At this point, you should have two remote repositories:
- origin, your own fork of the initial MEPP repository
- upstreamMEPP-team, the remote repository you have just added containing the initial MEPP repository
You can see the state of a remote repository called 'remotename' under a shell with the command 'git remote show remotename':
- git remote show origin
- git remote show upstreamMEPP-team (you can use the tab keyboard key to auto complete 'upstream...' for example)
In the normal workflow, you can pull from the main MEPP repository (upstreamMEPP-team)...
With 'TortoiseGit':
- right-click on/into 'C:\MEPP.git\MEPP' and select 'TortoiseGit' -> 'Pull...', then choose the remote 'upstreamMEPP-team' and click 'OK'
Under a shell:
- git pull upstreamMEPP-team master
but only push to your own fork of MEPP (origin):
With 'TortoiseGit':
- right-click on/into 'C:\MEPP.git\MEPP' and select 'TortoiseGit' -> 'Push...', then choose the remote 'origin' and click 'OK'
Under a shell:
- git push origin master
The merge between the two repositories is done by ANOTHER DEVELOPER after a 'pull request'.
To make a 'pull request', go to https://github.com/yourUsername/MEPP, click on 'Pull Request'. Then, choose the two branches you would like to merge (master in MEPP-team and yourbranch in origin), write your comments and click on 'Send Pull Request'.
4. Edit files and commit in branches
1) Before starting to work, pull the upstreamMEPP-team (you have to be online).
With 'TortoiseGit':
- right-click on/into 'C:\MEPP.git\MEPP' and select 'TortoiseGit' -> 'Pull...', then choose the remote 'upstreamMEPP-team' and click 'OK'
Under a shell:
- git pull upstreamMEPP-team master
2) By default, you have a main local branch called master. Create a local branch 'cool-feature'.
With 'TortoiseGit':
- right-click on/into 'C:\MEPP.git\MEPP' and select 'TortoiseGit' -> 'Create Branch...', then set 'cool-feature' in the 'Branch' field and click 'OK'
Under a shell:
- git branch cool-feature
Note that you can see the list of your local branches under a shell:
- git branch
Note also that the branch marked with a star ('*') is your current active local branch. At this point you should see:
cool-feature
* master
3) Jump onto your new local branch (i.e. git 'checkout' action, but IMPORTANT, forget the 'checkout' term/action of SVN, it has nothing to do!):
With 'TortoiseGit':
- right-click on/into 'C:\MEPP.git\MEPP' and select 'TortoiseGit' -> 'Switch/Checkout...', then choose the branch 'cool-feature' and click 'OK'
Under a shell:
- git checkout cool-feature
After taping the command 'git branch' you should see now:
* cool-feature
master
4) Add files
With 'TortoiseGit':
- right-click on/into 'C:\MEPP.git\MEPP' and select 'TortoiseGit' -> 'Add...', then check the file(s) you want to add and click 'OK' (IMPORTANT: to delete or rename a file, right-clik on it and choose 'TortoiseGit' -> 'Delete' or -> 'Rename...')
Under a shell:
- git add cool-file1.cpp (or use wildcards...) (IMPORTANT: to delete a file, do 'git rm -f file', to rename a file, do 'git mv filesrc filedst')
5) Commit local branch after adding or editing files
With 'TortoiseGit':
- right-click on/into 'C:\MEPP.git\MEPP' and select DIRECTLY 'Git Commit -> "cool-feature"...'
- IMPORTANT: put a comment, only in English please, in the 'Message' field and click 'OK'
Under a shell:
- git commit -a -m "This commit concerns the cool-feature..." (IMPORTANT: put a comment, only in English please)
6) Push to your fork (you have to be online)
With 'TortoiseGit':
- right-click on/into 'C:\MEPP.git\MEPP' and select 'TortoiseGit' -> 'Push...', then choose the local 'cool-feature' and the remote 'origin' and then click 'OK'
Under a shell:
- git push origin cool-feature
7) If you have to work on another issue (e.g. bug #42), you can create a new local branch 'bug42' from your master, jump onto it, commit edits, and push:
- git checkout master (or 'TortoiseGit' -> 'Switch/Checkout...')
- git branch bug42 (or 'TortoiseGit' -> 'Create Branch...')
- git checkout bug42 (or 'TortoiseGit' -> 'Switch/Checkout...')
- git commit -a -m "Bug #42 fixed..." (or DIRECTLY 'Git Commit -> "bug42"...')
- git push origin bug42 (or 'TortoiseGit' -> 'Push...')
8) Once you have finished to work on an issue, go to https://github.com/yourUsername/MEPP and ask for a 'Pull Request'
9) Once the 'Pull Request' has been validate and the merge done, you can remove your local branch:
With 'TortoiseGit':
- right-click on/into 'C:\MEPP.git\MEPP' and select 'TortoiseGit' -> 'Switch/Checkout...', then choose the branch 'master' and click 'OK'
- then, press 'Shift' key, right-click on/into 'C:\MEPP.git\MEPP' and select 'TortoiseGit' -> 'Browse Reference', then choose 'cool-feature' branch, right-click, choose 'Delete branch'
Under a shell:
- git checkout master
- git branch -d cool-feature
And you can also remove the associated remote branch (because everything should be merged into the 'master' of either your fork, or the main MEPP master):
With 'TortoiseGit':
- press 'Shift' key, right-click on/into 'C:\MEPP.git\MEPP' and select 'TortoiseGit' -> 'Browse Reference', choose 'cool-feature' remotes origin, right-click, then choose 'Delete remote branch'
Under a shell:
- git push origin :cool-feature
5. Useful git commands
In this section, we detail couple of useful git commands.
1) git stash
Let suppose you have edited some files and that you figure out that these modifications should be in another branch (or you figure out that your are working on the wrong branch):
With 'TortoiseGit':
- right-click on/into 'C:\MEPP.git\MEPP' and select 'TortoiseGit' -> 'Stash Save', then you can enter a 'Stash Message' and then click 'OK'
Under a shell:
- git stash
will put all your edits (uncommited edits) into a patch stack (and remove them from your working copy). Then, you can create your new local branch and 'pop' your edit from the stack to reapply the changes:
With 'TortoiseGit':
- right-click on/into 'C:\MEPP.git\MEPP' and select 'TortoiseGit' -> 'Stash Pop'
Under a shell:
- git stash pop
Or if you prefer to cleanup your stack, you can do:
With 'TortoiseGit':
- right-click on/into 'C:\MEPP.git\MEPP' and select 'TortoiseGit' -> 'Stash List', choose a stash, right-click and then click 'Delete ref...' and finally click on 'Delete'
Under a shell:
- git stash clear
2) git status
If you want to see the status of your current branch:
With 'TortoiseGit':
- right-click on/into 'C:\MEPP.git\MEPP' and select 'TortoiseGit' -> 'Check for modifications'
Under a shell:
- git status
3) git merge
If you want to merge the master branch in your 'cool-feature2' branch:
With 'TortoiseGit':
- right-click on/into 'C:\MEPP.git\MEPP' and select 'TortoiseGit' -> 'Switch/Checkout...', then choose the branch 'cool-feature2' and click 'OK'
- right-click on/into 'C:\MEPP.git\MEPP' and select 'TortoiseGit' -> 'Merge...' and then choose from branch 'master' and click 'OK'
- right-click on/into 'C:\MEPP.git\MEPP' and select DIRECTLY 'Git Commit -> "cool-feature2"...'
Under a shell:
- git checkout cool-feature2 (we go to the 'cool-feature2' branch)
- git merge master (merge master -> 'cool-feature2')
- git commit -a -m "..."
6. Resolving git conflict (uncommon)
Even if it's very rare, conflict can appear when you try to apply for example a pull:
"...
...
...
...
Automatic merge failed; fix conflicts and then commit the result."
To resolve a git conflict you just have to edit the file(s) in conflict with a text editor (only one file with git!) and choose the code blocks you want to keep and then do a commit. That's all!
7. Important things
- git branches are local (but we can publish a remote branch too)
- except pull/push actions, everything else can be done offline (with a consistent history)
- merge are easy
8. See also (under a shell) - help.github.com/git-user-manual
- git fetch upstreamXXX
- git checkout --track upstreamXXX/old-feature
- git remote prune upstreamXXX
9. Tips
Problem (Windows): TortoiseGit icons not showing correctly (or not showing at all) ?
Solution:
- open regedit.exe
- go to HKEY_LOCAL_MACHINE\Software\Microsoft\Windows\CurrentVersion\Explorer
- add a new string key "Max Cached Icons" with value "2048"
- restart your computer