![]()
Component developer guide / Author : Martial Tola
Table of contents
1. Creating a new component (example : from component CGAL_Example)
1.1. Your component must have a unique name and must be related to a category
1.2. Follow CGAL_Example component
1.3. Comment your new component with Doxygen
1.4. Using the code of a component X in your component
2. Description of component files (example : from component CGAL_Example)
3. Detailed component explanation (example : from component CGAL_Example)
3.1. Common methods to all components (plugin)
3.2. Common methods to all components (component)
3.3. CGAL_Example component specific methods
3.3.1. Step1: mesh triangulation and random color facets
3.3.2. Step2: creating a point in the central facet (and thus 3 sub-facets) whose color is near to a color chosen by the user
3.3.3. Step3: for all facets cut in step2, look into all neighboring facets having a common half-edge and allocation of a white or black color to these according to a given criterion
3.3.4. Step4: display "connections" between various polyhedrons (only in "space" mode)
3.3.5. Step5: fix a position and orientation for the "frame" of the current polyhedron (only in "space" mode)
3.3.6. Step6: create a new child window with an example polyhedron or add an example polyhedron to the current child window
3.3.7. Step7/8: load/save a polyhedron in its component (eg file format specific to the component)
3.3.8. Step9: use another component within its component
3.3.9. Keyboard / mouse event handling, user interaction
4. Addition of dialog boxes at the interface of a component
4.1. Creating a dialog (with Qt Designer)
4.2. Invoking your dialog and retrieve the values entered/indicated in the code of your component
4.3. Note about the use of multiple dialog boxes in your component
1. Creating a new component (example : from component CGAL_Example)
Note : the MEPP "core" shall not normally be changed.
1.1. Your component must have a unique name and must be related to a category from the list below:
- analysis,
- compression,
- distance,
- remeshing,
- segmentation,
- tools,
- watermarking,
or optionally,
- examples.
a) This name must also be the name of the subdirectory (containing the source code of your component) in this category (see CGAL_Example component).
b) The name of the C++ class for this component must be of type YourComponent_Component (see CGAL_Example component).
c) The name of the C++ plugin class (which goes along with the above class) of your component must be of type mepp_component_YourComponent_plugin (see CGAL_Example component).
Important : beware of the "case sensitive" for these three points.
1.2. Follow CGAL_Example component in \src\components\Examples\CGAL_Example:
A "clean" and accurate "case sensitive" renaming in ".cpp", ".h" and ".hxx" files should allow you to easily obtain the skeleton of your component.
So, we will take below as an example the creation of the new component Various_Tools who belong to the category Tools.
To do this, you must:
a) copy the \src\components\Examples\CGAL_Example folder in \src\components\Tools folder,
b) rename this "new" CGAL_Example folder to Various_Tools,
c) VERY IMPORTANT : recursively delete all ".svn" files from the Various_Tools folder (not necessary if you use git instead),
d) optionally uncomment line 10 (deletion of #) in \src\components\Tools\Various_Tools\cmake\use_components.txt file if you want to use another component within your own component, see 1.4. below (here we leave the comment because we do not want to use Curvature in Various_Tools),
e) in \src\components\Tools\Various_Tools\src folder, rename all files by changing CGAL_Example with Various_Tools (beware of the "case sensitive"),
f) finally, with a text editor and a "find and replace" function, replace (respecting the "case") in all ".cpp", ".h" and ".hxx" files in the \src\components\Tools\Various_Tools\src folder:
CGAL_Example by Various_Tools
and
CGAL_EXAMPLE by VARIOUS_TOOLS
Your menu is then declared in the mepp_component_Various_Tools_plugin.hxx file by linking it to the category mentioned above, and declaring the menu actions as shown below (see CGAL_Example component).
From there, the "CMake script" takes care of everything, there is no need to touch a single line of code in the MEPP kernel (nor the mepp_config.h.in file, nor the polyhedron_enriched_polyhedron.h file, nor the mainwindow.ui file for the menu).
Just simply invoke CMake (see readme_EN_Windows_VSxxxx.txt, readme_EN_Linux.txt or readme_EN_Mac_OS_X.txt).
1.3. Comment your new component with Doxygen
See tutorial for Doxygen: Franck Hecht - http://franckh.developpez.com/tutoriels/outils/doxygen/ (not exhaustive but generally sufficient).
1.4. Using the code of a component X in your component (without dialogs management of component X at this time):
Note : in this example, we use the Curvature component in the CGAL_Example component.
a) In \src\components\Examples\CGAL_Example\cmake\use_components.txt set the ".c"/".cpp" files you need with the CMake "set" function (see last line):
set( use_components ../../Analysis/Curvature/src/Curvature_Component.cpp ../../Analysis/Curvature/src/extract_Vpropres.cpp )
b) In \src\components\Examples\CGAL_Example\mepp_component_CGAL_Example_plugin.cpp set the following lines at the top of the file:
c) Then the Curvature call and use in \src\components\Examples\CGAL_Example\mepp_component_CGAL_Example_plugin.cpp happens like this, see step9 function() below:
2. Description of component files (example : from component CGAL_Example)
CGAL_Example_Polyhedron.h
Includes all statements and all related typedefs to CGAL and to the polyhedron.
As it includes the polyhedron, simply include this file in your component to access the polyhedron and declared typedefs.
It is therefore advisable to include this file and not directly the MEPP polyhedron.h file.
CGAL_Example_Items.h
Includes all definitions of component items.
Allows you to add variables and methods to the vertices, edges and facets of the polyhedron and to the polyhedron itself.
CGAL_Example_Component.h/.cpp
Defines the component API (programming interface).
This is the set of functions which define the mesh processing operations introduced by the platform developer. The component is used exclusively through this API. No GUI element should be present inside of these files, or their dependent files.
mepp_component_CGAL_Example_plugin.h/.cpp
This is the link between the GUI and the component.
All GUI elements should be located within these files (and their dependent files if needed). Communicates with the component through the API defined in CGAL_Example_Component.h.
3. Detailed component explanation (example : from component CGAL_Example)
Component files (plugin, ie dynamic library): mepp_component_CGAL_Example_plugin.h/.cpp
Component files (CGAL pure part): CGAL_Example_Component.h/.cpp
3.1. Common methods to all components (see mepp_component_CGAL_Example_plugin.cpp):
void mepp_component_CGAL_Example_plugin::pre_draw(), method automatically called before the polyhedron rendering.
It is possible to add rendering of component specific elements. All pre_draw() methods are called before rendering.
It is advisable to allow enable/disable pre_draw rendering (when it is not empty) through one or more variables related to the GUI (pressing a button, click on a menu item).
void mepp_component_CGAL_Example_plugin::post_draw(), method automatically called after the polyhedron rendering.
It is possible to add rendering of component specific elements. All post_draw() methods are called after rendering.
It is advisable to allow enable/disable post_draw rendering (when it is not empty) through one or more variables related to the GUI (pressing a button, click on a menu item).
---
void mepp_component_CGAL_Example_plugin::pre_draw_all_scene(), same as pre_draw(), but called automatically before rendering ALL polyhedrons (only in "space" mode).
void mepp_component_CGAL_Example_plugin::post_draw_all_scene(), same as post_draw(), but called automatically after rendering ALL polyhedrons (only in "space" mode).
---
void mepp_component_CGAL_Example_plugin::OnMouseLeftDown(QMouseEvent *event), method called after a mouse left click pressed when the "alt" key (on Windows and Mac OS X) or the "meta" key ie "the Windows key" (on Linux) is maintained.
void mepp_component_CGAL_Example_plugin::OnMouseLeftUp(QMouseEvent *event), method called after a mouse left click released when the "alt" key (on Windows and Mac OS X) or the "meta" key ie "the Windows key" (on Linux) is maintained.
---
void mepp_component_CGAL_Example_plugin::OnMouseRightDown(QMouseEvent *event), method called after a mouse right click pressed when the "alt" key (on Windows and Mac OS X) or the "meta" key ie "the Windows key" (on Linux) is maintained.
void mepp_component_CGAL_Example_plugin::OnMouseRightUp(QMouseEvent *event), method called after a mouse right click released when the "alt" key (on Windows and Mac OS X) or the "meta" key ie "the Windows key" (on Linux) is maintained.
---
void mepp_component_CGAL_Example_plugin::OnMouseMotion(QMouseEvent *event), method called after a mouse movement when the "alt" key (on Windows and Mac OS X) or the "meta" key ie "the Windows key" (on Linux) is maintained.
---
void mepp_component_CGAL_Example_plugin::OnMouseWheel(QWheelEvent *event), method called after a mouse wheel movement when the "alt" key (on Windows and Mac OS X) or the "meta" key ie "the Windows key" (on Linux) is maintained.
---
void mepp_component_CGAL_Example_plugin::OnKeyPress(QKeyEvent *event), method called after pressing a key when the "alt" key (on Windows and Mac OS X) or the "meta" key ie "the Windows key" (on Linux) is maintained.
void mepp_component_CGAL_Example_plugin::OnKeyRelease(QKeyEvent *event), method called after releasing a key when the "alt" key (on Windows and Mac OS X) or the "meta" key ie "the Windows key" (on Linux) is maintained.
3.2. Common methods to all components (see CGAL_Example_Component.cpp):
CGAL_Example_Component::CGAL_Example_Component(Viewer* v, PolyhedronPtr p), component constructor.
You can initialize your variables here but it is important to at least inform correctly those below (that is to say the name of your component and the initial state of the latter at its creation, see 3.3.1. below):
3.3. CGAL_Example component specific methods
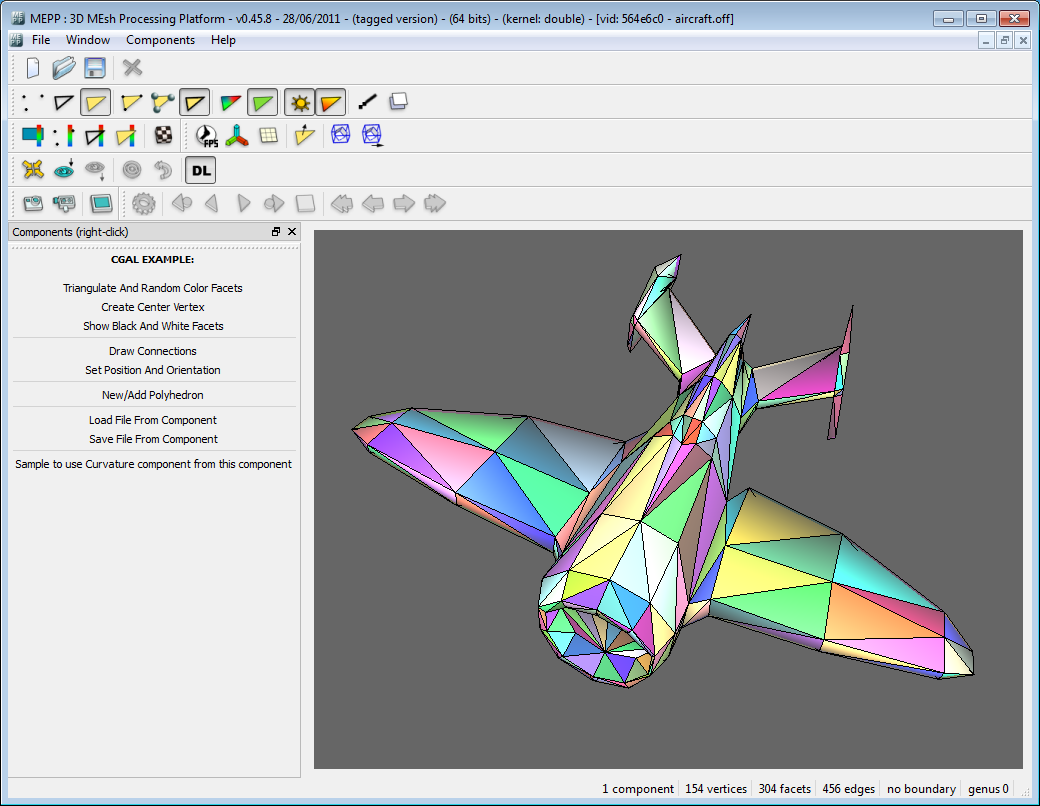
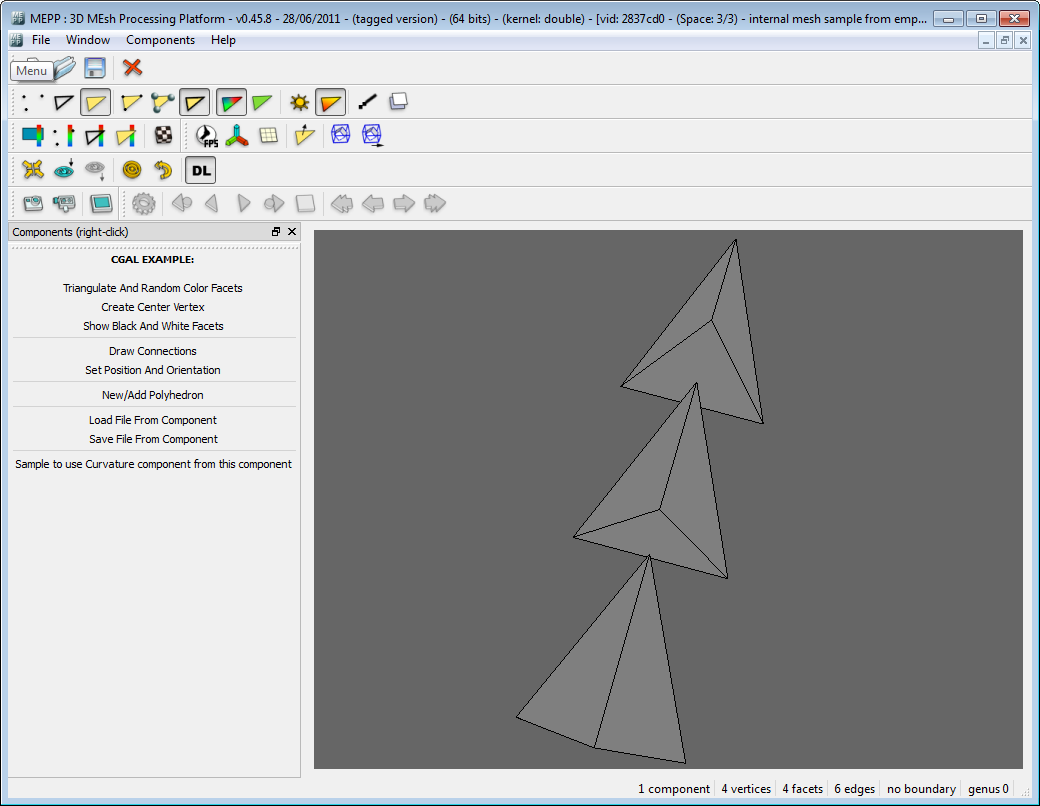
3.3.1. Step1: mesh triangulation and random color facets
In CGAL_Example_Component.h:
We will first declare our first step function. This function will be "public".
void TriangulateAndRandomColorFacets(PolyhedronPtr pMesh);
The body of this function will be present in CGAL_Example_Component.cpp:
Explanations:
(1) The polyhedron is first triangulated in all cases. This operation has only an effect if the polyhedron is not already triangulated.
(2) We go through all facets with a facets iterator and each facet is assigned with random R, G, B components.
In mepp_component_CGAL_Example_plugin.cpp:
We called our first function above through step1 function() which can be invoked by the component menu or toolbar.
Explanations:
(3) Through a mouse cursor "hourglass", we tell the user that MEPP is currently occupied.
(4) We get a pointer to the polyhedron.
(5) We get a pointer to the component.
(6) We call our function, passing it our polyhedron pointer.
(7) We set the component to "state 2" (it was in "state 1" at its creation, see 3.2. above) and we refresh the display.
(8) We inform the user that processing is now done by repositioning the "classic" mouse cursor.
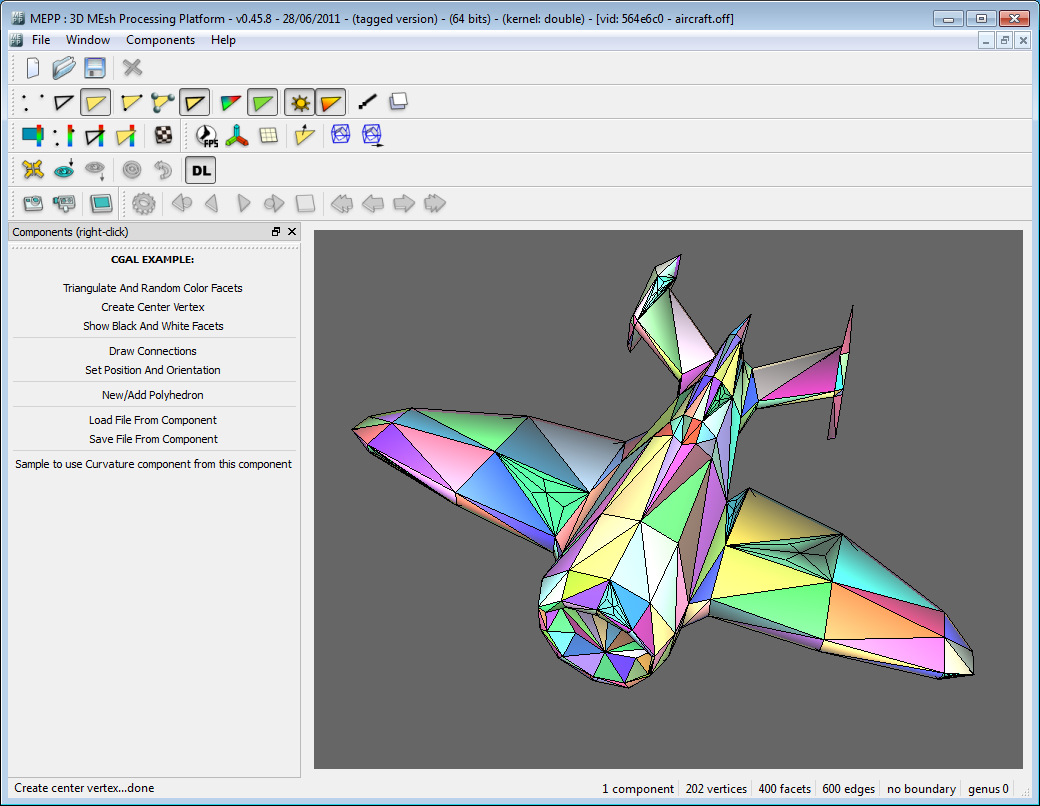
3.3.2. Step2: creating a point in the central facet (and thus 3 sub-facets) whose color is near to a color chosen by the user
In CGAL_Example_Component.h:
We will first declare our second step function. This function will be "public".
void CreateCenterVertex(PolyhedronPtr pMesh, bool save);
The body of this function will be present in CGAL_Example_Component.cpp:
Explanations:
(1) We go through all facets with a facets iterator to calculate "min" and "max" color distances from the color chosen by the user.
(2) We go through all facets with a facets iterator. For all facets not previously cut into 3 sub-facets (ie not tagged) and close in terms of color distance about 3% of the color chosen by the user, we create a central point and three sub-facets.
(3) The central point and the three sub-facets are created through an object of class CSubdivider_sqrt3.
In mepp_component_CGAL_Example_plugin.cpp:
We called our second function above through step2 function() which can be invoked by the component menu or toolbar.
Explanations:
(4) We get a pointer to the polyhedron.
(5) We get a pointer to the component.
(6) We call the Qt color selector dialog and get the chosen color.
(7) We call our dialog box created using Qt Designer (see 4. below) in order to know how many times the user wants to create central points (and thus sub-facets): iteration.
(8) We inform the MEPP status bar to mean that a treatment is being.
(9) For all polyhedrons, we call our function (iteration times), passing it our polyhedron pointer.
3.3.3. Step3: for all facets cut in step2, look into all neighboring facets having a common half-edge and allocation of a white or black color to these according to a given criterion
In CGAL_Example_Component.h:
We will first declare our third step function. This function will be "public".
void ShowBlackAndWhiteFacets(PolyhedronPtr pMesh);
The body of this function will be present in CGAL_Example_Component.cpp:
Explanations:
(1) We go through all facets with a facets iterator.
(2) For all facets cut in step2 (and hence tagged), we use a half-edges circulator and for all these half-edges,
(3) we color the incident facet to the opposite half-edge (if it exists!) in white if it's not a tagged facet, otherwise,
(4) we color the incident facet to the opposite half-edge (if it exists!) in black if all neighboring facets are tagged.
In mepp_component_CGAL_Example_plugin.cpp:
We called our third function above through step3 function() which can be invoked by the component menu or toolbar.
Explanations:
(5) We call our function, passing it our polyhedron pointer.

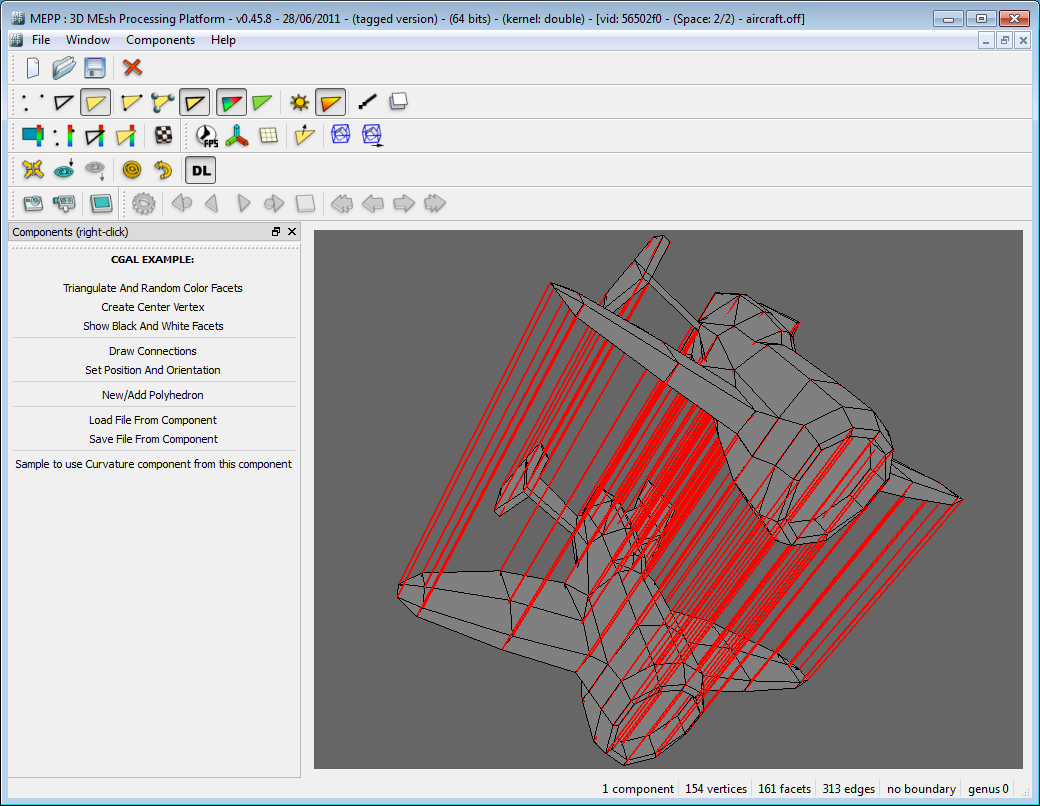
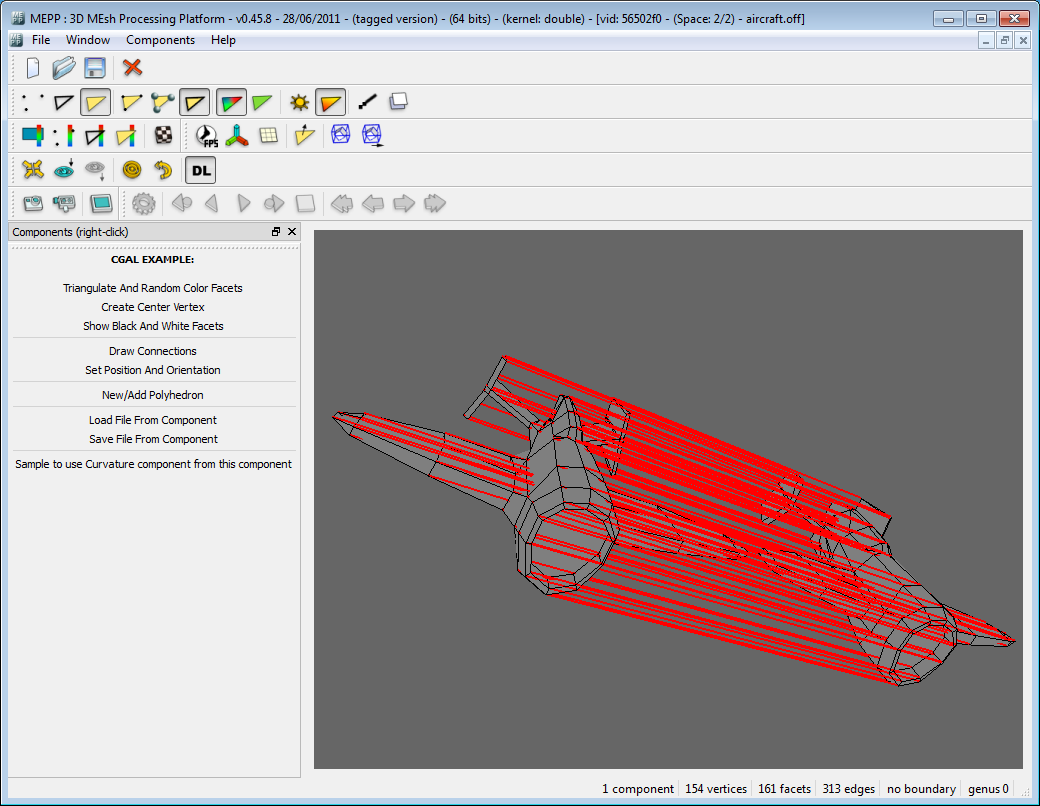
3.3.4. Step4: display "connections" between various polyhedrons (only in "space" mode)
In mepp_component_CGAL_Example_plugin.cpp:
We called our fourth function above through step4 function() which can be invoked by the component menu or toolbar.
Explanations:
(1) We set the "init" flag to 3 (at the creation of the component, the "init" flag was initialized to 1).
Note : the flag positioned to 2 serves for another function.
Then the void mepp_component_CGAL_Example_plugin::post_draw_all_scene() function (see 3.1.) automatically called after rendering ALL polyhedrons (only in "space" mode) tests the "init" flag and if its value is 3 performs then the display of "connections" (see below).
Explanations:
(2) We test the value of the "init" flag.
(3) We draw connections.
3.3.5. Step5: fix a position and orientation for the frame of the current polyhedron (only in "space" mode)
In mepp_component_CGAL_Example_plugin.cpp:
We called our fifth function above through step5 function() which can be invoked by the component menu or toolbar.
Explanations:
(1) We set the frame of the current polyhedron to (2, 0, 0) in the world coordinate system.
(2) We turn the frame of the current polyhedron without any rotation on all axes in the world coordinate system.
(3) We refresh the display.
3.3.6. Step6: create a new child window with an example polyhedron or add an example polyhedron to the current child window
In mepp_component_CGAL_Example_plugin.cpp:
We called our sixth function above through step6 function() which can be invoked by the component menu or toolbar.
Explanations:
(1) If there is an open and active child window in MEPP:
(2) we emit a signal to add an empty polyhedron in this child window,
(3) we get its pointer and create the example polyhedron: a tetrahedron,
(4) we give it a name and we refresh the child window title,
(5) we refresh the display.
If there is no open and active child window in MEPP:
(6) we emit a signal to create a new child window,
(7) then we go through all the MEPP child windows and we look for the empty child window newly created,
(8) we then retrieve the pointer of the empty polyhedron and create the example polyhedron: a tetrahedron,
(9) we center the scene to see the newly created polyhedron in its entirety,
(10) we give it a name and we refresh the child window title.
3.3.7. Step7/8: load/save a polyhedron in its component (eg file format specific to the component)
In mepp_component_CGAL_Example_plugin.cpp:
We called our seventh function above through step7 function() which can be invoked by the component menu or toolbar.
Explanations:
(1) We send a signal to open a dialog with the parameters tr("Open Mesh File(s) - from CGAL_Example"), tr("OFF files (*.off)"), Normal and then invoke the load_file_from_component component-specific function (see below).
Explanations:
(2) We get a pointer to the plugin component.
(3) We get a pointer to the component.
(4) We call a function to load the polyhedron. Here, in this example, it is the default ".off" files loading but it may be a specific format (see Compression_Valence component and P3D format).
Note : the principle is the same to save a polyhedron in its component (but instead we use the save_file_from_component component-specific function).
3.3.8. Step9: use another component within its component
In mepp_component_CGAL_Example_plugin.cpp:
We called our ninth function above through step9 function() which can be invoked by the component menu or toolbar.
Explanations:
(1) The component is used as usual.
(2) We use another component using another pointer to the component in question (but prior to, see 1.2.d) and see 1.4.).
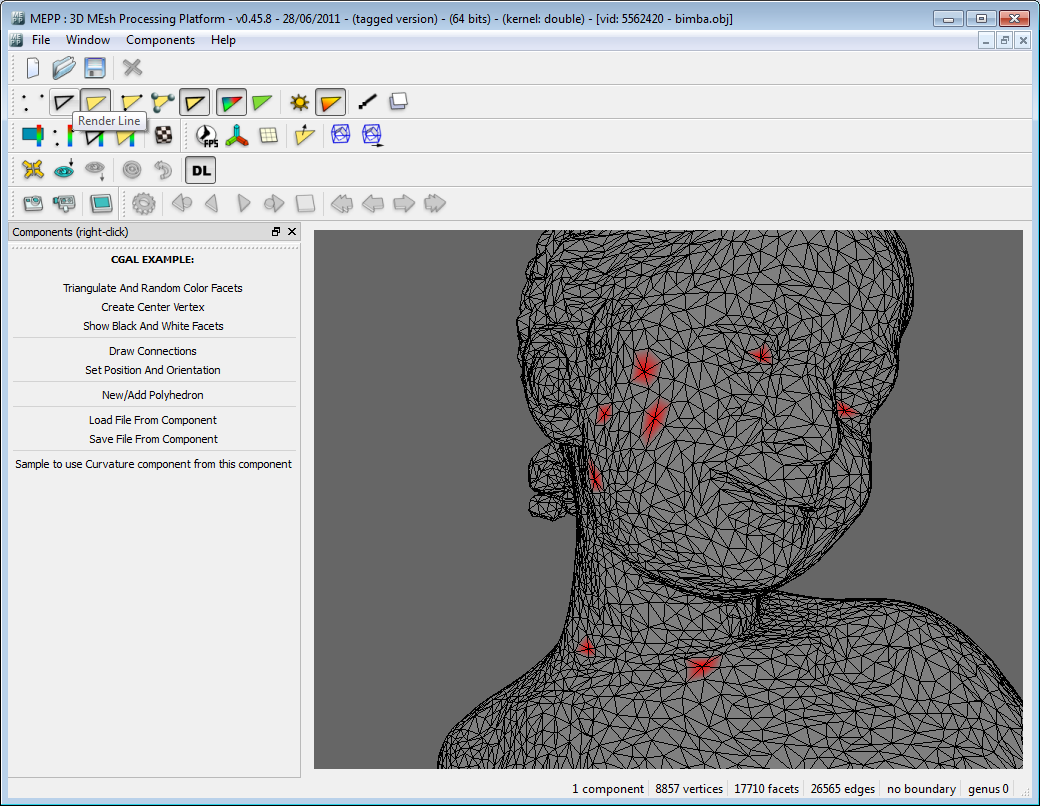
3.3.9. Keyboard / mouse event handling, user interaction
In CGAL_Example_Component.h:
We will first declare our function. This function will be "public".
void GetClickedVertices(PolyhedronPtr pMesh, double x, double y, int tolerance);
The body of this function will be present in CGAL_Example_Component.cpp:
Explanations:
(1) We get the three OpenGL matrices (GL_VIEWPORT, GL_MODELVIEW_MATRIX, GL_PROJECTION_MATRIX).
(2) For all vertices, we project its coordinates in the "window space",
(3) we fix a small tolerance to ease the "vertex clicking",
(4) we color the vertex (once identified) in red.
In mepp_component_CGAL_Example_plugin.cpp:
The function is called through the OnMouseLeftDown(QMouseEvent *event) event.
Explanations:
(5) We check first (through the doesExistComponentForViewer function) that this component (CGAL_Example) has already been instantiated within this child window, ie it has already been invoked and used.
Indeed, if this was not the case, the event would be to ignore.
This important test allows to send the event only to "active" components, otherwise all components (even "inactive") would receive the event.
(6) We inform the MEPP status bar to signify that a click has just happened and left this message displayed only for 1 second.
(7) We call our function, passing it our polyhedron pointer and the x, y "window space" coordinates. Here we fix a tolerance of 10 pixels in x and y for the accuracy of the click.
4. Addition of dialog boxes at the interface of a component
4.1. Creating a dialog (with Qt Designer)
a) Locate Qt Designer:
- on Windows, this tool is in C:\dev\qt-x.x.x\bin : designer.exe,
- on Linux, this tool is in the "Applications > Programmation > Qt 4 Designer" menu,
- on Mac, this tool is via "Finder > Applications > MacPorts > Qt4 > Designer".
b) Open the ".ui" file of your component to place your widgets as you want to be, you can read an interesting part of a Qt Designer tutorial here:
http://www.siteduzero.com/tutoriel-3-11360-modeliser-ses-fenetres-avec-qt-designer.html#ss_part_2
This one has indeed particularly important concepts like "layouts", "spacers" and also the window edition widgets properties.
You can also open ".ui" files of the following components to inspire you:
- Canonical component dialSettings.ui
- VSA component dialSettings.ui
- Compression_Valence component dialSettings*.ui
During this step it will be especially IMPORTANT TO NAME your widgets PROPERLY using the object inspector present at the top of the right column of Qt Designer.
c) Save your dialog.
4.2. Invoking your dialog and retrieve the values entered/indicated in the code of your component:
In \src\components\Your_Category\Your_Component\src\mepp_component_Your_Component_plugin.cpp use code like this:
4.3. Note about the use of multiple dialog boxes in your component
a) Duplicate the 3 following files:
- dialSettings_Your_Component.ui
- dialSettings_Your_Component.cpp
- dialSettings_Your_Component.hxx
to
- dialSettingsFunction_Your_Component.ui
- dialSettingsFunction_Your_Component.cpp
- dialSettingsFunction_Your_Component.hxx
(Function is something here relating to this new dialog box.)
b) Open dialSettingsFunction_Your_Component.ui with Qt Designer to rename the new dialog box using the Object Inspector
(here the QDialog "objectName" property becomes "SettingsFonction" instead of "Settings".)
c) Save your dialog.
d) Find and replace respecting the "case":
- HEADER_MEPP_COMPONENT_YOUR_COMPONENT_PLUGIN_SETTINGS_H by HEADER_MEPP_COMPONENT_YOUR_COMPONENT_PLUGIN_SETTINGS_FUNCTION_H in dialSettingsFunction_Your_Component.hxx
- ui_dialSettings_Your_Component.h by ui_dialSettingsFunction_Your_Component.h in dialSettingsFunction_Your_Component.hxx
- Ui_Settings by Ui_SettingsFunction in dialSettingsFunction_Your_Component.hxx
- dialSettings_Your_Component.hxx by dialSettingsFunction_Your_Component.hxx in dialSettingsFunction_Your_Component.cpp
- SettingsDialog_Your_Component by SettingsDialogFunction_Your_Component in dialSettingsFunction_Your_Component.cpp/(.hxx) files
e) In:
\src\components\Your_Category\Your_Component\src\mepp_component_Your_Component_plugin.cpp, in line 11 add the following line:
#include "dialSettingsFunction_Your_Component.hxx"
then use code similar to this one to retrieve the values entered/indicated in the code of your component: